android25
post:x07044408
title
x07044408
body
Comments on: Unwrap the New 4shared App Features on Android
https://blog.4shared.com/unwrap-new-android-app/
4shared news and articlesFri, 19 Apr 2024 05:52:17 +0000hourly1https://wordpress.org/?v=4.8.3By: Shanky
https://blog.4shared.com/unwrap-new-android-app/#comment-592645
Thu, 13 Apr 2023 07:49:29 +0000https://blog.4shared.com/?p=11833#comment-592645“The post provides insight and very helpful . If anyone travelling to dehradun , rishikesh, haridwar and want Taxi, Self Drive Cars on rent in Dehradun ,Rishikesh ,Haridwar visit our website. Website address is mention below. Self Drive Cars in dehradun for as low as Rs1500. Taxi service in dehradun, Rishikesh, Haridwar as low as Rs15/km. Delivery and Pickup also available.
]]>By: wasib
https://blog.4shared.com/unwrap-new-android-app/#comment-580679
Fri, 27 Jan 2023 08:55:15 +0000https://blog.4shared.com/?p=11833#comment-580679This article is very interesting. I read this article and its amazing, and i hope you upload more informative post.
]]>By: Lhassdi
https://blog.4shared.com/unwrap-new-android-app/#comment-466133
Fri, 09 Oct 2020 16:21:02 +0000https://blog.4shared.com/?p=11833#comment-466133Merci bouco
]]>By: Lhassdi
https://blog.4shared.com/unwrap-new-android-app/#comment-466131
Fri, 09 Oct 2020 16:20:21 +0000https://blog.4shared.com/?p=11833#comment-466131Mohamed Lhassdi
]]>By: dubaipest
https://blog.4shared.com/unwrap-new-android-app/#comment-458123
Mon, 27 Jul 2020 09:36:14 +0000https://blog.4shared.com/?p=11833#comment-458123This blog post is very interesting content and informative post. I hope you are providing already amazing content I am read the content and I am very happy for visit our website:-https://pestcontroldubaiprice.com/
]]>By: MAKE UP
https://blog.4shared.com/unwrap-new-android-app/#comment-456411
Wed, 15 Jul 2020 13:37:59 +0000https://blog.4shared.com/?p=11833#comment-456411NICE SHARING AMAZING ONE KEEP POSTING
]]>
post:x07044404
title
x07044404
body
Comments on: Try out Improved Camera Upload Features in 4shared for Android
https://blog.4shared.com/improved-camera-upload-features-4shared-android/
4shared news and articlesFri, 19 Apr 2024 05:52:17 +0000hourly1https://wordpress.org/?v=4.8.3By: Winapster
https://blog.4shared.com/improved-camera-upload-features-4shared-android/#comment-595177
Mon, 01 May 2023 11:55:40 +0000https://blog.4shared.com/?p=12093#comment-595177hi! I like your article. please visit my site for more articles.
]]>By: youn byung hee
https://blog.4shared.com/improved-camera-upload-features-4shared-android/#comment-593923
Fri, 21 Apr 2023 23:15:10 +0000https://blog.4shared.com/?p=12093#comment-593923Reply
]]>By: CLEUZa Rosa Pinheiro
https://blog.4shared.com/improved-camera-upload-features-4shared-android/#comment-593475
Tue, 18 Apr 2023 14:02:16 +0000https://blog.4shared.com/?p=12093#comment-593475Gosto muito do aplicativo mas não gosto das propagandas de pornografia pois sou evangélica
]]>By: Marcos
https://blog.4shared.com/improved-camera-upload-features-4shared-android/#comment-551057
Thu, 07 Jul 2022 12:34:36 +0000https://blog.4shared.com/?p=12093#comment-551057Bom mas as vezes falha
]]>By: Nursia
https://blog.4shared.com/improved-camera-upload-features-4shared-android/#comment-546169
Fri, 27 May 2022 12:16:59 +0000https://blog.4shared.com/?p=12093#comment-546169Sangat bagus ini applikasih terimakasih
]]>By: Samuel Miguel dos Santos
https://blog.4shared.com/improved-camera-upload-features-4shared-android/#comment-541237
Sat, 30 Apr 2022 09:30:43 +0000https://blog.4shared.com/?p=12093#comment-541237Ótimo domingo para todos nós amém meu Deus
]]>By: Eduardo Pereira Boeira
https://blog.4shared.com/improved-camera-upload-features-4shared-android/#comment-534481
Wed, 23 Feb 2022 15:10:06 +0000https://blog.4shared.com/?p=12093#comment-534481Oi
]]>By: Untung
https://blog.4shared.com/improved-camera-upload-features-4shared-android/#comment-532507
Sun, 06 Feb 2022 13:18:04 +0000https://blog.4shared.com/?p=12093#comment-532507Bagus.
]]>By: Luiza rufina santana
https://blog.4shared.com/improved-camera-upload-features-4shared-android/#comment-526223
Thu, 23 Dec 2021 13:28:37 +0000https://blog.4shared.com/?p=12093#comment-526223Eu já tenho. Uso o 4xared a anos, gosto muito e prático, ouço e baixo minhas músicas preferidas sempre. Indico também. Obrigado e feliz Natal.
]]>By: Harris
https://blog.4shared.com/improved-camera-upload-features-4shared-android/#comment-525611
Tue, 21 Dec 2021 09:14:21 +0000https://blog.4shared.com/?p=12093#comment-525611Wow, this is so great.
]]>
post:x09785685
title
x09785685
body
Nuovo tutorial Opel con le istruzioni per l’uso di Android Auto su Opel Insignia - Electric Motor News
Nuovo tutorial Opel con le istruzioni per l’uso di Android Auto su Opel Insignia
In questa puntata, il tutorial Opel mostra come sfruttare al meglio le potenzialità di Android Auto, nel sistema Multimedia Navi Pro di Opel Insignia e altri modelli.
I tutorial di Opel mostrano in modo semplice e diretto come utilizzare le principali componenti delle vetture del marchio tedesco
Un dispositivo mobile consente di accedere facilmente alla propria vita digitale, permette di stare connessi ovunque ci si trovi, anche in auto.
Android Auto è un modo pratico per utilizzare determinate applicazioni del proprio dispositivo mobile quando si è a bordo. Prima di iniziare, scaricare l’app “Android Auto” da Google PlayStore.
Come prima cosa, abilitare Android Auto nel sistema infotainment, cliccare su Impostazioni, quindi accedere al menu App e verificare se Android Auto è attivato.
Collegare il proprio dispositivo mobile al sistema infotainment, utilizzando il cavo USB fornito dal produttore del dispositivo. Per utilizzare Android Auto, leggere il messaggio visualizzato sul display del sistema infotainment e confermare per continuare.
A questo punto sulla schermata iniziale verrà attivata l’icona Android Auto, cliccare su Android Auto. La prima volta che si utilizza l’applicazione occorre fare attenzione alle richieste del sistema sul proprio dispositivo mobile.
Con Android Auto determinate applicazioni del proprio dispositivo mobile sono utilizzabili attraverso il sistema infotainment dell’auto, per riprodurre musica, telefonare, inviare messaggi, navigare e altro ancora.
Per parlare a Google, cliccare sull’icona del microfono o tenere premuto il pulsante di attivazione del comando vocale sul volante.
Si può sempre tornare al sistema infotainment, premendo il pulsante home.
Il veicolo commerciale leggero Opel Vivaro-e Hydrogen è ideale per le flotte, per chi ha bisogno di percorrere lunghi tratti o chi deve fare rifornimento in pochi minuti. […]
Opel Corsa-e 100% elettrica è la sesta generazione di un modello di successo a livello globale ed è dotata di sistemi autonomi di assistenza alla guida di ultima generazione. […]
post:x07044403
title
x07044403
body
4shared blog
https://blog.4shared.com
4shared news and articlesFri, 29 Mar 2024 09:28:52 +0000en-UShourly1https://wordpress.org/?v=4.8.3Happy Easter!
https://blog.4shared.com/happy-easter/
https://blog.4shared.com/happy-easter/#commentsFri, 29 Mar 2024 09:23:58 +0000https://blog.4shared.com/?p=12277
]]>https://blog.4shared.com/happy-easter/feed/44shared Recognized as the Top Cloud Storage by HostingAdvice
https://blog.4shared.com/4shared-recognized-as-the-top-cloud-storage-by-hostingadvice/
https://blog.4shared.com/4shared-recognized-as-the-top-cloud-storage-by-hostingadvice/#commentsThu, 21 Mar 2024 17:01:37 +0000https://blog.4shared.com/?p=12261
In their talk with the CTO of 4shared, the HostingAdvice team members discuss the company’s history, the key 4shared benefits and what the future of cloud storage will be like.
For almost two decades of the history of 4shared, hundreds of millions of users have enjoyed utilizing our cloud storage, file sharing & media streaming features. Well, just recently our accomplishments have been also recognized by one of the leading media outlets covering the global tech news and innovations – HostingAdvice.com.
In their article, the HostingAdvice team explores the key 4shared products & features, and discusses the present & future of the world’s cloud storage market with our company’s CTO.
Check out the article via this link and share your thoughts regarding it in comments.
]]>https://blog.4shared.com/infographic-4shared-2021-review/feed/41Try out Improved Camera Upload Features in 4shared for Android
https://blog.4shared.com/improved-camera-upload-features-4shared-android/
https://blog.4shared.com/improved-camera-upload-features-4shared-android/#commentsTue, 25 May 2021 06:02:55 +0000https://blog.4shared.com/?p=12093
Just recently we’ve enhanced the “Camera Upload” functionality in
your 4shared app for Android devices!
Aiming to make your 4shared experience on Android even better, we’ve upgraded the “Camera Upload” feature in our mobile app to streamline the backup of photos and videos from your device camera in your secure cloud storage at 4shared.
While the upload process has become even smoother now, we’ve also added a convenient sorting option by months to enable the faster and easier media search in your 4shared account.
Try out the upgrade today – install the latest version of 4shared for Android from Google Play!
]]>https://blog.4shared.com/improved-camera-upload-features-4shared-android/feed/41Unlock new live music streaming features in 4shared for Android
https://blog.4shared.com/unlock-live-music-streaming-features-4shared-android/
https://blog.4shared.com/unlock-live-music-streaming-features-4shared-android/#commentsMon, 12 Apr 2021 08:42:24 +0000https://blog.4shared.com/?p=12037
The past months have been a wild ride!
We’ve been working day and night to develop the new cutting-edge functionality in 4shared apps, and now it’s time we introduce the latest novelties in 4shared for Android!
Long story short, we’ve recently launched a brand-new feature for 4shared users on Android – “Live streaming.”
Not only does it enable users to stream live music shows by 4shared users near you, or currently popular in your country, but start your own live stream any time, in a matter of a few clicks.
Variety of live music streams for your selection
The “Music” tab in your 4shared for Android app now has a new section called “Live”, where you can select a currently live music show for instant listening on your device.
Choose a livestream based on your location and/or music preferences, and simply click on it to start listening. In addition, follow your favorite artists to keep up with their updates and check out the new Lives just as they’re launched.
Share your music vibe by creating your own Live
Starting your own Live is super-easy.
To do that:
1. Tap an audio file in your 4shared account.
Note! Only music files, stored at 4shared (not locally on device) are available for streaming in a live.
2. Tap “Start Live.” 3. Name your livestream and tap “Start Live Now.” That’s it.
This year has been anything but ordinary!
Now that 2020 is coming to its end, let’s look back at what we’ve accomplished together over the past 12 months.
]]>https://blog.4shared.com/infographic-4shared-2020-review/feed/98
post:x07044989
title
x07044989
body
Network Headlines
https://networkheadlines.com/
The Tangled Guide to NetworkingSun, 31 Dec 2023 10:27:55 +0000en-US
hourly
1 https://wordpress.org/?v=6.5.2VPN Quiz Helper
https://networkheadlines.com/vpn-quiz/
https://networkheadlines.com/vpn-quiz/#respondSun, 31 Dec 2023 10:18:49 +0000https://networkheadlines.com/?p=271Below you can find our answers to the most common quiz questions around VPN’s: Which process is used to protect transmitted data in a VPN? Symmetric key encryption and public-key…
]]>https://networkheadlines.com/vpn-quiz/feed/0Five Best Routers for Households with Multiple Devices
https://networkheadlines.com/best-router-for-multiple-devices/
https://networkheadlines.com/best-router-for-multiple-devices/#respondSun, 31 Dec 2023 10:17:01 +0000https://networkheadlines.com/?p=268Choosing the best router for a home environment, especially when catering to multiple devices, involves considering factors like range, speed, number of bands, and advanced features like Quality of Service…
Choosing the best router for a home environment, especially when catering to multiple devices, involves considering factors like range, speed, number of bands, and advanced features like Quality of Service (QoS). As of my last update in April 2023, here are five highly regarded routers that are well-suited for homes with multiple devices:
Netgear Nighthawk AX12 (RAX120): Known for its excellent range and speed, the Nighthawk AX12 is a Wi-Fi 6 router offering up to 12 simultaneous streams, making it ideal for homes with many devices. It features a powerful 2.2 GHz quad-core processor and provides advanced QoS options.
Asus RT-AX88U: This router stands out for its combination of Wi-Fi 6 support, extensive coverage, and multiple Ethernet ports (8 ports). It’s great for a mix of wired and wireless devices and offers robust parental controls and adaptive QoS, which is beneficial for prioritizing traffic like gaming or streaming.
Google Nest Wifi: This system is a popular choice for those who prefer a mesh network for consistent coverage throughout the home. It’s user-friendly, offers reliable performance, and each Nest Wifi point also functions as a smart speaker with Google Assistant.
TP-Link Archer AX6000: Offering Wi-Fi 6 capabilities, this TP-Link model is known for its high speeds and impressive coverage. It includes eight LAN ports and a USB-C port, making it versatile for various home setups. Its advanced QoS and security features add to its appeal for a multi-device household.
Linksys Velop MX10: This mesh Wi-Fi system is designed for large homes and can handle more than 50 devices. The Velop MX10 supports Wi-Fi 6 and offers a simple setup process, robust parental controls, and seamless roaming throughout the house.
When selecting a router, consider your specific home layout, the number and type of devices you have, and any specific needs like gaming or streaming. Routers with Wi-Fi 6 technology are generally recommended for future-proofing your home network as more devices start supporting the newer standard. Remember, the best choice for you will depend on your unique requirements and budget.
]]>https://networkheadlines.com/best-router-for-multiple-devices/feed/0How to Install a VPN on Your Modem
https://networkheadlines.com/vpn-modem/
https://networkheadlines.com/vpn-modem/#respondSun, 31 Dec 2023 10:14:29 +0000https://networkheadlines.com/?p=265Configuring a Virtual Private Network (VPN) on your modem is an advanced way to secure your entire internet connection at its source. Unlike routers, modems typically don’t have built-in VPN…
]]>Configuring a Virtual Private Network (VPN) on your modem is an advanced way to secure your entire internet connection at its source. Unlike routers, modems typically don’t have built-in VPN capabilities. Therefore, this guide focuses on a modem-router combo or a separate router attached to your modem, which is a more common and feasible setup for VPN installation.
Benefits of Installing a VPN on Your Modem
Comprehensive Network Security: Encrypts all internet traffic from your home network, offering uniform security and privacy.
Simplified Device Management: Avoids the need for individual VPN installations on each device.
Always-On Protection: Ensures that all devices connected to the network are consistently protected by the VPN.
Unlock Geo-Restricted Content: Access international content across all network-connected devices.
Requirements
A VPN-compatible router connected to your modem. (Modems typically do not support VPN software directly.)
An active VPN subscription. Choose a VPN provider that supports router installations, such as NordVPN, ExpressVPN, or IPVanish.
VPN configuration files and credentials from your VPN provider.
Setting Up a VPN on a Router Connected to Your Modem
Step 1: Verify Your Hardware Compatibility
Ensure that your router (connected to the modem) is VPN-capable. If not, consider acquiring a router that supports VPN client functionality or can be flashed with firmware like DD-WRT or Tomato.
Step 2: Access Your Router’s Admin Panel
Type your router’s IP address into a web browser to access the admin panel.
Log in with your admin credentials.
Step 3: Configure the VPN
Find the VPN section in your router’s settings. This could be under ‘Advanced’, ‘Network’, or similar settings.
For routers without built-in VPN client support, consider flashing it with third-party firmware that enables VPN functionality.
Step 4: Enter VPN Details
Input the VPN configuration details provided by your VPN service. This typically includes server addresses, your VPN account details, and specific security or protocol settings.
For detailed setup instructions, refer to guidelines provided by your VPN service, as procedures can vary with different providers and router models.
Step 5: Save and Reboot
After configuring the settings, save them and reboot your router.
Test the VPN connection for functionality. Check your IP address through whatismyipaddress.com or similar sites to verify that your VPN is active.
Tips for Successful VPN Installation on a Modem-Router Setup
Firmware Updates: Update your router to the latest firmware before installing the VPN.
Protocol Choice: Prefer secure protocols like OpenVPN for a balance of speed and security.
Internet Speed Considerations: VPN encryption can reduce internet speeds. Opt for a VPN known for its high-speed connections.
Backup Original Settings: Save your current router settings before making changes for easy restoration if needed.
Seek Technical Assistance: If unsure about the setup, consult with a technical expert or the router’s customer support.
Advanced VPN Configurations
Split Tunneling: Some routers offer split tunneling, allowing specific devices or services to bypass the VPN.
Multi-VPN Profiles: Advanced routers might support multiple VPN profiles for different user needs.
Guest Network Considerations: Decide if you want the VPN to cover guest networks as well.
Conclusion
Installing a VPN on your modem-router setup is an effective strategy for enhancing the overall security and privacy of your home network. Although the process requires some technical proficiency, the benefits, such as enhanced security for all connected devices and access to a wide range of content, are substantial. Following this guide will help you secure your internet connection right from its source, ensuring peace of mind and a safer online experience.
]]>https://networkheadlines.com/vpn-modem/feed/0A Guide on how to Install a VPN on Your Router
https://networkheadlines.com/vpn-router/
https://networkheadlines.com/vpn-router/#respondSun, 31 Dec 2023 10:13:12 +0000https://networkheadlines.com/?p=262Installing a Virtual Private Network (VPN) directly on your router is a powerful way to secure your entire home network. By doing so, every device connected to your router –…
]]>Installing a Virtual Private Network (VPN) directly on your router is a powerful way to secure your entire home network. By doing so, every device connected to your router – from smartphones to smart TVs – will benefit from enhanced privacy and security. This guide provides step-by-step instructions on how to install a VPN on your router.
Benefits of Installing a VPN on a Router
Network-Wide Security: Encrypts the internet traffic of every device connected to your network.
Simplified Management: Eliminates the need to install VPN software on each individual device.
Uninterrupted Protection: Ensures continuous VPN protection for all devices, even when they are not in use.
Access Geo-Restricted Content: Stream and access content from different regions across all connected devices.
Requirements
A VPN-compatible router. Not all routers support VPN client functionality. Check your router’s specifications or consult the manufacturer.
An active VPN subscription. Choose a VPN provider that offers compatibility with router installations, such as NordVPN, ExpressVPN, or IPVanish.
The VPN configuration files and details from your VPN provider.
Step-by-Step Guide to Installing a VPN on a Router
Step 1: Access Your Router’s Admin Panel
Enter your router’s IP address into a web browser.
Log in with your admin username and password.
Step 2: Configure the VPN
Locate the VPN section in your router’s admin panel. This might be under settings like ‘Network’, ‘Advanced’, or ‘WAN’.
If your router has a built-in VPN client, select it. Otherwise, you may need to flash your router with firmware like DD-WRT or Tomato that supports VPNs.
Step 3: Enter VPN Details
Input the details provided by your VPN service. This will typically include server addresses, your VPN username and password, and possibly specific security settings or keys.
For specific configurations, refer to the setup guidelines provided by your VPN service, as procedures can vary depending on the provider and router model.
Step 4: Save and Test Your Settings
Save your settings and reboot your router.
Test the connection to ensure the VPN is working correctly. You can do this by checking your IP address via a website like whatismyipaddress.com.
Tips for VPN Router Installation
Firmware Update: Ensure your router’s firmware is up to date before installing the VPN.
VPN Protocol Selection: Opt for secure protocols like OpenVPN, which offer a good balance of speed and security.
Network Speeds: Be aware that encrypting your traffic via a VPN might reduce internet speeds. Choose a VPN known for its fast performance.
Backup Settings: Before making changes, back up your current router settings in case you need to revert.
Technical Support: If you’re not comfortable making these changes, consider reaching out to a tech-savvy friend or professional for assistance.
Advanced Considerations
Split Tunneling: Some advanced routers allow for split tunneling, where you can choose which devices or traffic go through the VPN.
Multiple VPN Profiles: Depending on your router, you might be able to set up multiple VPN profiles to switch between different servers or VPN services.
Guest Network VPN: Consider whether you want the VPN to apply to guest networks as well.
Conclusion
Setting up a VPN on your router is an effective way to secure your entire home network. While the process requires some technical know-how, the overarching privacy and security benefits are significant. By following this guide, you can enjoy the enhanced security and content access that a VPN-enabled router provides for all your connected devices.
]]>https://networkheadlines.com/vpn-router/feed/0A Guide on Using a VPN on an iPhone
https://networkheadlines.com/vpn-iphone/
https://networkheadlines.com/vpn-iphone/#respondSun, 31 Dec 2023 10:10:56 +0000https://networkheadlines.com/?p=258Using a Virtual Private Network (VPN) on your iPhone is a proactive step towards safeguarding your online activities. A VPN can encrypt your internet traffic, ensuring privacy and security, particularly…
]]>Using a Virtual Private Network (VPN) on your iPhone is a proactive step towards safeguarding your online activities. A VPN can encrypt your internet traffic, ensuring privacy and security, particularly when connecting to public Wi-Fi networks. This guide explains how to set up and use a VPN on your iPhone and outlines the key benefits of utilizing this technology.
Why Use a VPN on Your iPhone?
Online Privacy: A VPN helps keep your online activities private by encrypting your internet connection, making it difficult for third parties to track or intercept your data.
Secure Public Wi-Fi Use: Public Wi-Fi is convenient but often unsecured. A VPN encrypts your data, protecting it from potential hackers on the same network.
Access Geo-Restricted Content: Bypass geographical restrictions to access a wider range of websites, streaming services, and apps.
Avoid ISP Throttling: Prevent your Internet Service Provider (ISP) from potentially slowing down your internet speed, especially during high-bandwidth activities like streaming.
Setting Up a VPN on an iPhone
Step 1: Choose a Reputable VPN Service
Select a VPN provider known for strong encryption, a no-logs policy, and iOS compatibility. Popular choices include NordVPN, ExpressVPN, and Surfshark.
Step 2: Download and Install the VPN App
Visit the App Store on your iPhone.
Search for the VPN service you selected and download its app.
Step 3: Configure the VPN App
Launch the VPN app.
Log in or sign up for an account if required.
Grant the app any permissions it needs to operate.
Step 4: Connect to a VPN Server
Select a server from the list provided in the app. If in doubt, use the app’s recommended server for optimal performance.
Tap the connect button to start the VPN service.
Step 5: Verify the Connection
Once connected, you should see a VPN icon in your iPhone’s status bar.
Use a website like ipleak.net to verify that your IP address has changed to the VPN server’s address.
Tips for Using a VPN on Your iPhone
Consistent Usage: Keep the VPN active to maintain privacy, especially when connected to public Wi-Fi networks.
Server Selection: Choose servers that are closer to your physical location for faster speeds, or servers in specific countries to access geo-restricted content.
Battery Usage: Note that using a VPN can impact battery life, so monitor your iPhone’s battery and adjust usage if needed.
Keep the App Updated: Regularly update the VPN app to ensure you have the latest security features and improvements.
Data Usage: Be aware that a VPN encrypts data which might slightly increase overall data usage. This is important to note if you have a limited data plan.
Advanced VPN Features on iPhone
Kill Switch: Some VPN apps include a kill switch feature that disconnects your device from the internet if the VPN connection drops, ensuring continuous privacy.
VPN Protocols: Explore different VPN protocols (like IKEv2, OpenVPN, or WireGuard) offered in the app for a balance between security and speed.
Split Tunneling: If available, use split tunneling to select which apps should use the VPN connection and which should connect directly to the internet.
Conclusion
Implementing a VPN on your iPhone is an effective way to enhance your online security and access a broader range of content. It’s a simple process that provides significant benefits, from protecting sensitive information to circumventing content restrictions. By following this guide, you can easily set up and maintain a VPN on your iPhone, ensuring a secure and unrestricted mobile browsing experience.
]]>https://networkheadlines.com/vpn-iphone/feed/0A Guide on Using a VPN With Your Android Phone
https://networkheadlines.com/vpn-android/
https://networkheadlines.com/vpn-android/#respondSun, 31 Dec 2023 10:09:36 +0000https://networkheadlines.com/?p=254Using a Virtual Private Network (VPN) on your Android phone is a smart way to enhance your online privacy and security. Whether you’re browsing the web, streaming content, or conducting…
]]>Using a Virtual Private Network (VPN) on your Android phone is a smart way to enhance your online privacy and security. Whether you’re browsing the web, streaming content, or conducting sensitive transactions, a VPN can provide a crucial layer of protection. This guide will explain how to use a VPN on your Android device and why it’s beneficial.
Why Use a VPN on Your Android Phone?
Privacy and Anonymity: A VPN encrypts your internet connection, keeping your online activities private from ISPs, advertisers, and potential eavesdroppers.
Secure Public Wi-Fi Use: Public Wi-Fi networks are often unsecured, making them hotspots for data theft. A VPN encrypts your data, safeguarding it from hackers.
Access Geo-Restricted Content: Stream and access content and services that are geographically restricted.
Avoid Bandwidth Throttling: Prevent your ISP from slowing down your internet speed, especially when streaming or downloading large files.
Setting Up a VPN on an Android Phone
Step 1: Choose a Reliable VPN Service
Opt for a reputable VPN provider that offers strong encryption, a no-logs policy, and Android compatibility. NordVPN, ExpressVPN, and CyberGhost are popular choices.
Step 2: Install the VPN App
Go to the Google Play Store on your Android phone.
Search for your chosen VPN service and install its app.
Step 3: Configure the VPN App
Open the VPN app.
Sign in or create an account if required.
Grant necessary permissions for the app to function correctly.
Step 4: Connect to a VPN Server
Select a server location. If you’re unsure, most apps have a ‘Quick Connect’ feature that chooses the best server for you.
Tap the connect button to initiate the VPN connection.
Step 5: Verify the Connection
Once connected, check if the VPN icon appears in your notification bar, indicating an active VPN connection.
Use an online tool like ipleak.net to verify that your IP address and DNS information are being masked.
Tips for Using a VPN on Android
Always-On VPN: Enable the always-on VPN feature in your Android settings to ensure the VPN runs continuously in the background.
Choose the Right Server: If you’re looking to access content from a specific country, make sure to connect to a server in that country.
Battery Considerations: Be aware that running a VPN can consume more battery power. Monitor your battery usage and adjust VPN usage accordingly.
Regular Updates: Keep your VPN app updated for the latest security features and best performance.
Wi-Fi and Cellular Data: Note that a VPN works with both Wi-Fi and cellular data. Be mindful of data usage if you have a limited data plan.
Advanced Considerations
Split Tunneling: Some VPN apps offer split tunneling, allowing you to choose which apps use the VPN connection and which use a direct internet connection.
Kill Switch Feature: Use a VPN with a kill switch feature, which automatically disconnects your internet if the VPN connection drops, maintaining your privacy.
Protocol Selection: Some apps allow you to choose the VPN protocol (e.g., OpenVPN, WireGuard). Experiment with different protocols for the best balance of speed and security.
Conclusion
Implementing a VPN on your Android phone is a straightforward process that significantly boosts your online privacy, security, and freedom. Whether you’re at home or on the go, a VPN ensures your digital life is safeguarded and unrestricted. Embrace the peace of mind and expanded capabilities that come with using a VPN on your Android device!
]]>https://networkheadlines.com/vpn-android/feed/0Setting Up a VPN on Your Raspberry Pi
https://networkheadlines.com/vpn-raspberry-pi/
https://networkheadlines.com/vpn-raspberry-pi/#respondSun, 31 Dec 2023 10:07:15 +0000https://networkheadlines.com/?p=234The Raspberry Pi, known for its versatility and compact size, can also serve as an effective platform for a Virtual Private Network (VPN). Whether you’re looking to secure your internet…
]]>The Raspberry Pi, known for its versatility and compact size, can also serve as an effective platform for a Virtual Private Network (VPN). Whether you’re looking to secure your internet connection or access geo-restricted content, setting up a VPN on a Raspberry Pi is a great project. This guide will walk you through the process step by step.
Why Set Up a VPN on a Raspberry Pi?
Enhanced Privacy and Security: Protect your online activities from prying eyes, especially when using public Wi-Fi networks.
Access Geo-Restricted Content: Bypass regional restrictions and access a broader range of online content.
Educational Value: It’s a rewarding educational experience in networking and Raspberry Pi capabilities.
What You’ll Need
A Raspberry Pi (any model with network capability)
A reliable microSD card with Raspberry Pi OS installed
An active internet connection
A subscription to a VPN service that supports OpenVPN or similar protocols
Basic familiarity with the Raspberry Pi and command line interface
Step-by-Step Guide to Setting Up a VPN
Step 1: Prepare Your Raspberry Pi
Ensure your Raspberry Pi OS is up to date:
sudo apt update

sudo apt upgrade
Step 2: Choose a VPN Provider
Opt for a VPN provider that supports OpenVPN. Providers like NordVPN, ExpressVPN, or OpenVPN offer configurations that are compatible with Raspberry Pi.
Step 3: Install OpenVPN
Install OpenVPN on your Raspberry Pi:
sudo apt install openvpn
Step 4: Download VPN Configuration Files
Download the OpenVPN configuration files from your VPN provider. This usually involves logging into your VPN account and downloading .ovpn files.
Step 5: Transfer Configuration Files to Raspberry Pi
Transfer the .ovpn files to your Raspberry Pi using a USB drive, SCP, or any file transfer method you prefer.
Step 6: Set Up VPN Connection
Navigate to the directory where you transferred the .ovpn files.
Start the VPN connection with:
sudo openvpn --config your-vpn-config-file.ovpn
Replace your-vpn-config-file.ovpn with the actual file name.
Step 7: Enter Login Credentials
If prompted, enter your VPN account username and password.
Step 8: Verify the VPN Connection
Once connected, verify your IP address has changed:
curl ifconfig.me
This command should display an IP address different from your actual one, indicating the VPN is working.
Automating the VPN Connection
Automate VPN on Boot
To ensure your VPN connection starts automatically on boot, you can create a service for it:
Create a new service file:
sudo nano /etc/systemd/system/openvpn@.service
Copy the content from /lib/systemd/system/openvpn@.service into this new file.
Replace your-vpn-config-file with the name of your .ovpn file (without the .ovpn extension).
Tips and Considerations
Security: Always use strong, unique passwords for your VPN and Raspberry Pi.
VPN Provider Choice: Make sure your VPN provider doesn’t log user data for maximum privacy.
Internet Speed: Be aware that using a VPN might affect your internet speed.
Power Supply: Ensure your Raspberry Pi has a stable power supply to maintain the VPN connection.
Regular Updates: Keep your Raspberry Pi and VPN software updated for security and performance.
Conclusion
Setting up a VPN on your Raspberry Pi can be a rewarding project, offering both enhanced online privacy and a great learning experience. With the steps outlined in this guide, you can turn your Raspberry Pi into a powerful tool for secure and private internet browsing. Happy computing!
]]>https://networkheadlines.com/vpn-raspberry-pi/feed/0A Universal Guide to Using a VPN on Your Smart TV
https://networkheadlines.com/vpn-smart-tv/
https://networkheadlines.com/vpn-smart-tv/#respondSun, 31 Dec 2023 10:01:55 +0000https://networkheadlines.com/?p=248In the ever-evolving world of smart technology, enhancing your Smart TV experience with a Virtual Private Network (VPN) can be a game-changer. Whether you’re looking to access geo-restricted content or…
]]>In the ever-evolving world of smart technology, enhancing your Smart TV experience with a Virtual Private Network (VPN) can be a game-changer. Whether you’re looking to access geo-restricted content or secure your online streaming activities, a VPN can be a crucial tool for any Smart TV user. This guide is designed to provide you with a universal approach to using a VPN on any Smart TV.
Why Use a VPN on a Smart TV?
1. Access Geo-Restricted Content: Unlock movies, TV shows, and streaming services not available in your region.
2. Enhanced Privacy and Security: Protect your streaming habits and personal data from being monitored or tracked.
3. Improved Streaming Quality: Some VPNs can help avoid ISP throttling, potentially leading to smoother streaming without buffering.
Setting Up a VPN on Your Smart TV
Step 1: Choose a VPN Compatible with Smart TVs
Select a VPN provider known for its compatibility with a variety of Smart TV brands and operating systems. Providers like NordVPN, ExpressVPN, and CyberGhost are often recommended.
Step 2: Determine the Installation Method
The method of installing a VPN on your Smart TV can vary based on the operating system and the capabilities of the TV itself. Here are the common approaches:a. VPN App for Smart TVs:
Some Smart TVs, especially those running on Android OS, have access to the Google Play Store where you can directly download and install VPN apps.
b. VPN via Router:
Install the VPN directly on your router. This way, all devices connected to your Wi-Fi, including your Smart TV, will use the VPN connection.
Check if your router supports VPN connections or if it can be flashed with firmware like DD-WRT or Tomato that does.
c. Smart DNS:
A Smart DNS is not a full VPN but can change your location for accessing geo-restricted content.
Some VPN services offer a Smart DNS feature that can be configured directly in your Smart TV’s network settings.
d. Share a VPN Connection from a Computer:
Create a virtual router on a VPN-connected computer and connect your Smart TV to this network.
Step 3: Connect to a VPN Server
Once your VPN is set up, connect to a server in the desired country to access content from that region.
Step 4: Start Streaming on Your Smart TV
With the VPN connection active, you can now enjoy a wider range of content securely and privately.
Tips for Using a VPN on a Smart TV
Regularly Update Software: Keep your VPN and Smart TV’s software updated for optimal performance and security.
Choose the Right Server: Experiment with different servers for the best streaming quality and speed.
Consider Internet Speeds: VPNs can sometimes slow down your connection, so ensure your internet speed is sufficient for high-quality streaming.
Check for VPN Features: Look for features like a kill switch, which ensures your internet connection is cut off if the VPN stops working, maintaining your privacy.
Use Ethernet Connection: For a more stable and faster connection, consider using an Ethernet cable for your Smart TV instead of Wi-Fi.
Conclusion
Integrating a VPN with your Smart TV can significantly enhance your streaming experience by unlocking a world of content and ensuring your viewing activities are private and secure. Whether through a direct app installation, router configuration, Smart DNS, or a shared connection from a computer, using a VPN on your Smart TV is straightforward. Enjoy the expansive, diverse, and secure world of entertainment that a VPN-enabled Smart TV offers!
]]>https://networkheadlines.com/vpn-smart-tv/feed/0A Guide to Using a VPN with Chrome OS
https://networkheadlines.com/vpn-chrome-os/
https://networkheadlines.com/vpn-chrome-os/#respondSun, 31 Dec 2023 09:40:51 +0000https://networkheadlines.com/?p=236Chrome OS, known for its simplicity and speed, is a popular choice for many users. Pairing it with a Virtual Private Network (VPN) can significantly enhance your online experience. This…
]]>Chrome OS, known for its simplicity and speed, is a popular choice for many users. Pairing it with a Virtual Private Network (VPN) can significantly enhance your online experience. This guide provides detailed instructions on how to use a VPN with Chrome OS, along with valuable tips, tricks, and insights into the benefits of this combination.
Benefits of Using a VPN on Chrome OS
1. Enhanced Privacy and Security: VPNs encrypt your internet connection, protecting your data from hackers, especially when using public Wi-Fi networks.
2. Access Restricted Content: A VPN can bypass geo-restrictions, allowing you to access a broader range of content, including websites and streaming services.
3. Safe Browsing: With a VPN, your browsing history and online activities are private, reducing the risk of tracking and data mining.
Setting Up a VPN on Chrome OS
1. Choose a VPN Provider: Select a VPN that is compatible with Chrome OS. Providers like NordVPN, ExpressVPN, and CyberGhost have dedicated support for Chrome OS.
2. Install the VPN App or Extension:
If your VPN provider offers a Chrome OS app, download it from the Google Play Store and install it.
Alternatively, many VPN services offer Chrome extensions. Install the extension directly from the Chrome Web Store.
3. Configure VPN Settings:
Open the VPN app or extension.
Log in with your VPN account details.
Choose a server location and connect.
Using VPN with Chromebook’s Built-in Feature
1. Gather VPN Details: Obtain the server address, provider type (L2TP/IPsec or OpenVPN), and login credentials from your VPN provider.
2. Access Chrome OS Settings:
Click on your account photo in the bottom right corner.
Input the details provided by your VPN service, including server hostname, service name, provider type, username, and password.
Save the configuration and connect.
Tips and Tricks for a Better VPN Experience on Chrome OS
1. Always-On VPN: For continuous security, set your VPN to connect automatically at startup. This ensures you’re always protected.
2. Server Selection: Experiment with different server locations for optimal speed and content access. Some servers may offer faster connections or access to specific geo-blocked content.
3. Keep it Updated: Regularly update your VPN app or extension to benefit from the latest security enhancements and features.
4. Use a Split Tunneling Feature: If your VPN offers split tunneling, utilize it to choose which apps go through the VPN and which ones use a direct internet connection.
5. Monitor Performance: Be aware of your Chromebook’s performance while using a VPN. Adjust settings if you notice significant slowdowns.
Advanced Tips
1. Secure Wi-Fi Networks: Always use VPN on public Wi-Fi networks to protect your data from potential threats.
2. Check for Leaks: Regularly check for DNS and IP leaks to ensure your VPN is functioning properly and your real IP address isn’t exposed.
3. VPN for Specific Tabs: If your VPN has a Chrome extension, you can often choose to enable VPN protection for specific tabs instead of the entire browsing session.
Conclusion
Integrating a VPN with Chrome OS is a smart way to enhance your online security, privacy, and freedom. Whether you opt for a dedicated app, a Chrome extension, or the built-in VPN feature of Chrome OS, the steps are straightforward. By following this guide and utilizing the tips and tricks provided, you can ensure a safe, private, and unrestricted browsing experience on your Chrome OS device. Enjoy the peace of mind and expanded possibilities that come with using a VPN on Chrome OS!
]]>https://networkheadlines.com/vpn-chrome-os/feed/0A Guide to Using a VPN With Netflix
https://networkheadlines.com/vpn-netflix/
https://networkheadlines.com/vpn-netflix/#respondSun, 31 Dec 2023 09:40:49 +0000https://networkheadlines.com/?p=235Netflix, with its vast library of movies and TV shows, is a treasure trove for entertainment enthusiasts. However, the content available can vary significantly from one country to another due…
]]>Netflix, with its vast library of movies and TV shows, is a treasure trove for entertainment enthusiasts. However, the content available can vary significantly from one country to another due to geo-restrictions. This is where a Virtual Private Network (VPN) becomes an invaluable tool. In this professional guide, I’ll walk you through how to enable, connect, and actively use a VPN with Netflix, outlining the benefits and providing tips to maximize your viewing experience.
Why Use a VPN with Netflix?
1. Access Global Content Libraries: Different countries have unique Netflix libraries. A VPN allows you to access content from around the world, widening your entertainment choices.
2. Privacy and Security: A VPN encrypts your internet connection, ensuring your streaming habits and personal data are safe from prying eyes, particularly on public Wi-Fi networks.
3. Avoid ISP Throttling: Some Internet Service Providers (ISPs) may throttle bandwidth for streaming services like Netflix. A VPN can help prevent this, ensuring smoother streaming without buffering.
Setting Up a VPN for Netflix
1. Choose a Netflix-Friendly VPN: Select a VPN that’s known for bypassing Netflix’s geo-restrictions effectively. Providers like ExpressVPN, NordVPN, and Surfshark have a reputation for working well with Netflix.
2. Install the VPN Software:
Download and install the VPN app on the device you use for Netflix.
Follow the setup wizard and complete the installation process.
3. Log Into the VPN:
Launch the VPN application.
Enter your login credentials to access the service.
4. Connect to a Server:
Choose a server in the country whose Netflix library you want to access.
Connect to the server to change your virtual location.
Actively Using a VPN with Netflix
1. Ensure VPN Connection Before Streaming: Always make sure your VPN is connected before opening the Netflix app or visiting the website. This ensures your real location is hidden.
2. Experiment with Servers: If you encounter a server that doesn’t work with Netflix, try different servers or regions. VPN services often update their server lists to keep up with Netflix’s measures.
3. Keep Apps Updated: Regularly update both your Netflix and VPN apps to enjoy the latest features and optimal performance.
Tips for an Enhanced Netflix and VPN Experience
1. Opt for Quality and Speed: Choose a VPN that offers high-speed connections and unlimited bandwidth for uninterrupted streaming.
2. Use the Right Device: Ensure your streaming device (smart TV, computer, smartphone) supports VPN apps or has the necessary configurations to use a VPN.
3. Beware of VPN Blocks: Netflix actively tries to block VPNs. If you find your current VPN no longer works with Netflix, contact your VPN’s customer support for advice or consider switching providers.
4. Explore Different Libraries: Take advantage of your VPN to explore Netflix libraries from various countries, discovering new shows and movies that might not be available in your region.
5. Check for Data Leaks: Regularly test your VPN for IP or DNS leaks to ensure your true location remains hidden.
Conclusion
Pairing a VPN with Netflix is a game-changer for movie and series enthusiasts. It not only unlocks a world of content but also provides an added layer of privacy and security. By carefully selecting a VPN provider and following these steps to connect and use it with Netflix, you can enhance your streaming experience exponentially. Enjoy diving into the endless sea of entertainment that Netflix, coupled with a VPN, can offer!
]]>https://networkheadlines.com/vpn-netflix/feed/0
post:x09149223
title
x09149223
body
Fotos de Rádio Jesus a VidaFotos públicas de Rádio Jesus a Vida em SAÚDE DO ESPÍRITO, ALMA E CORPO
http://saude-espirito-alma-corpo.ning.com/photo/photo/listForContributor?screenName=30nlcb174a4gf
Fri, 26 Apr 2024 18:55:15 +0000Fri, 26 Apr 2024 18:55:15 +0000Fotos de Rádio Jesus a Vida
http://saude-espirito-alma-corpo.ning.com/photo/photo/listForContributor?screenName=30nlcb174a4gf
http://storage.ning.com/topology/rest/1.0/file/get/793890194?profile=RESIZE_64x64&width=50&height=50&crop=1%3A1503331974:Photo:145148Amor
http://saude-espirito-alma-corpo.ning.com/photo/amor
<a href="http://storage.ning.com/topology/rest/1.0/file/get/793970670?profile=RESIZE_710x&width=503"><img src="http://storage.ning.com/topology/rest/1.0/file/get/793970670?profile=RESIZE_710x&width=240"></a>
por Rádio Jesus a Vida Fri, 18 Jan 2019 02:06:37 +0000Rádio Jesus a VidaRádio Jesus a Vidahttp://saude-espirito-alma-corpo.ning.com/profile/radiojesusavida3331974:Photo:145147Aplicativo oficial Android
http://saude-espirito-alma-corpo.ning.com/photo/aplicativo-oficial-android
<a href="http://storage.ning.com/topology/rest/1.0/file/get/793970668?profile=RESIZE_710x&width=504"><img src="http://storage.ning.com/topology/rest/1.0/file/get/793970668?profile=RESIZE_710x&width=240"></a>
por Rádio Jesus a Vida Fri, 18 Jan 2019 02:06:37 +0000Rádio Jesus a VidaRádio Jesus a Vidahttp://saude-espirito-alma-corpo.ning.com/profile/radiojesusavida3331974:Photo:145146Tenha fé
http://saude-espirito-alma-corpo.ning.com/photo/tenha-f
<a href="http://storage.ning.com/topology/rest/1.0/file/get/793970599?profile=RESIZE_710x&width=503"><img src="http://storage.ning.com/topology/rest/1.0/file/get/793970599?profile=RESIZE_710x&width=240"></a>
por Rádio Jesus a Vida Fri, 18 Jan 2019 02:06:37 +0000Rádio Jesus a VidaRádio Jesus a Vidahttp://saude-espirito-alma-corpo.ning.com/profile/radiojesusavida3331974:Photo:145145VERSICULO 2
http://saude-espirito-alma-corpo.ning.com/photo/versiculo-2
<a href="http://storage.ning.com/topology/rest/1.0/file/get/793970666?profile=RESIZE_710x&width=503"><img src="http://storage.ning.com/topology/rest/1.0/file/get/793970666?profile=RESIZE_710x&width=240"></a>
por Rádio Jesus a Vida Fri, 18 Jan 2019 02:06:37 +0000Rádio Jesus a VidaRádio Jesus a Vidahttp://saude-espirito-alma-corpo.ning.com/profile/radiojesusavida3331974:Photo:145144Adorar
http://saude-espirito-alma-corpo.ning.com/photo/adorar
<a href="http://storage.ning.com/topology/rest/1.0/file/get/793970664?profile=RESIZE_710x&width=503"><img src="http://storage.ning.com/topology/rest/1.0/file/get/793970664?profile=RESIZE_710x&width=240"></a>
por Rádio Jesus a Vida Fri, 18 Jan 2019 02:06:37 +0000Rádio Jesus a VidaRádio Jesus a Vidahttp://saude-espirito-alma-corpo.ning.com/profile/radiojesusavida
post:x0335915
title
x0335915
body
Home Assistant
post:x0335916
title
x0335916
body
Home Assistant
post:x02964380
title
x02964380
body
Freelance UX Designer from Munich · Jürgen Röhm
https://www.jroehm.com
Freelance UX Designer from MunichTue, 13 Feb 2024 10:47:20 +0000en-US
hourly
1 https://www.jroehm.com/wp-content/uploads/2019/04/JR_Logo-3.pngFreelance UX Designer from Munich · Jürgen Röhm
https://www.jroehm.com
3232How Much Should I Charge as a UX Freelancer in Germany?
https://www.jroehm.com/2023/04/16/how-much-should-i-charge-as-a-ux-freelancer-in-germany/
https://www.jroehm.com/2023/04/16/how-much-should-i-charge-as-a-ux-freelancer-in-germany/#respondSun, 16 Apr 2023 21:10:12 +0000https://www.jroehm.com/?p=23253
There are multiple pricing strategies for freelancers. Charging for time is the most common and universal. However, it can be tricky to determine the appropriate rate. In this article, I explain a few calculation methods, list concrete numbers, and share helpful resources. I explain how to find freelance UX projects in another article.
Method 1: Calculate your Minimum Acceptable Rate
There is one simple rule for freelance rates: Never charge less money than you need to live. Simple enough – but how little is too little? To figure that out, you need to calculate your total costs (expenses, insurance, and taxes) and divide them by the number of working days.
Business and Living Expenses
Your business expenses as a freelancer include all costs necessary to deliver a service or product to your customers. For example, office rent, software licenses, computer hardware, training, and marketing.
Your living expenses consist, among other things, of rent, food, clothing, mobility, and (private) insurance. It’s very helpful to create lists for these costs and calculate your total expenses. You can look at your account statements from the previous year, record your expenses for a few months in a budget book, or use apps like Finanzguru or Outbank.
Healthcare and Pension Insurance
As a freelancer in Germany, you must pay for health and care insurance (Kranken- und Pflegeversicherung). The exact rate depends on whether you have statutory or private insurance (Gesetzliche / Private Krankensversicherung). In the case of the former, the Techniker Krankenkasse offers a simple tool to calculate your healthcare contribution. It’s based on your income, lies between 200-910€ per month, and is almost the same for all statutory insurance companies. Private insurance calculates contributions individually based on income, age, and physical condition. To get a first price indication, the Ottova calculator for their private health insurance is nice and well-designed.
As a freelancer in a “creative industry” such as UX and UI design, you can take advantage of the Künstlersozialkasse (KSK – artists’ social insurance), which takes over 50% of health and care insurance costs. When you become a member of the KSK, you’ll have to pay into German pension insurance (Rentenversicherung), which is an additional cost, but it’s still a good deal! Freie Wildbahn e.V. offers a simple tool to calculate your KSK contributions.
You’re not obligated to pay for unemployment insurance (Arbeitslosenversicherung) or pension insurance. However, you should take a look at both insurances and decide for yourself, whether it makes sense in your situation. Especially saving for retirement is a very important topic and you should carefully evaluate the various options! For the sake of simplicity, the following example calculations include 1000€ per month as pension reserve and no contributions towards unemployment insurance.
Income Tax
Income tax in Germany ranges from 14-45%. The Germany Federal Ministry of Finance offers an online tool to calculate your income tax rate. Additionally, if you’re liable for church tax (Kirchensteuer) this costs 8% of your income tax and, if you earn a lot, you’ll have to pay the solidarity surcharge (Solidaritätsbeitrag), which is 5,5% of your income tax.
Working Days
The number of 200 working days is a good approximation. It accounts for public holidays in Germany, 30 vacation days, and around 15 days of absence, e.g., due to sickness. However, this also means that you’re fully booked throughout the year and you have little to no idle time between projects.
You should never go below your minimum rate! Otherwise, you will not be able to sustainably run a profitable business. “Profitable” is even a bit of an exaggeration, since you can hardly cover your costs with this daily rate. Use one of the following two methods to calculate a market-typical and more profitable rate so you don’t sell yourself short or cause trouble for other freelancers through wage dumping.
Method 2: Calculate from (Desired) Income
Another method of calculating a daily rate is determining your desired annual income and dividing it by the number of working days. This is especially helpful when you move from a permanent position to being freelance because you can use your current salary as a starting point.
You can also base your calculation on statistical data, e.g., from one of the following sources (all figures are rounded and refer to yearly full-time gross salaries):
The Entgeldatlas of the German Federal Employment Agency lists 40.800€ (3.400€/month) as the mean salary in 2021.
According to Stepstone42.200€ (3.500€/month) is the average yearly salary in 2023.
Gehaltscheck by kununu nicely visualizes salary ranges and reports an average of 50.600€ (4.200€/month) in 2023.
The Branchenreport of the German Usability Professionals Association lists 62.000€ (5.166€/month) as average in 2023.
The website levels.fyi lists 71.000€ (5.900€/month) as the median total compensation for a Product Designer in 2023.
UX Design Report 2023 by Konzepthaus reports 75.600€ (6.300€/month) as the annual salary for designers with a bachelor’s degree and no leadership role.
Of course, salaries vary depending on education, experience, industry, type of company, and location. If you want to dig deeper, the resources above break down the salary distribution according to various criteria.
Salaries of User Experience Designers in Germany according to kununu
Starting from your (desired) yearly salary, you need to add the employer’s 50% share of health and care insurance. Assuming that you don’t have unemployment insurance you can deduct the contributions since it’s mandatory insurance for employees and therefore already included in the gross salary. Finanzfluss offers a practical calculator for social security contributions that lists the various deductions.
Freelancers typically charge more than their salaried counterparts since they carry a higher entrepreneurial risk. They don’t earn anything, during any absence from work (vacation, sickness), a lack of projects, or when a customer can’t pay. It’s hard to propose a number but, I’d personally factor in a risk premium of at least 30%.
Kajy Calculator
The Allianz deutscher Designer (AGD) offers a very helpful hourly rate calculator called “Kajy”. It’s based on the described method and guides you through the calculation step by step.
A third method is conducting a competitive analysis to determine market-typical rates. This method requires gathering data on what other freelance UX designers with similar skills and experience are charging for their services. Besides asking fellow freelancers, you can take a look at the following sources:
The Freelancing in Europe 2022 study by Malt and BCG lists 615€ as the daily rate in the category “Arts and Design” in Germany.
Malts’ Barometer of Freelance Rates breaks down daily rates according to experience, area of expertise, and city. In early 2023 reports ~650€ as the average for UX designers. Designers in Munich earn the most and in Cologne the least due to differences in economic strength and the cost of living.
The average daily rates of designers in Germany according to Malt
The Branchenreport 2023 of the German UPA includes daily rates from 600-1.000€ with an average of 735€ (down from 800€ in 2022).
The hourly rate calculator by Gulp nicely shows the distribution of hourly rates for UX freelancers ranging from 30-150€ with a clear majority at 90€ (720€ / day).
Freelancer Kompass 2023 by freelancermap.de doesn’t specifically mention UX freelancers but reports an average daily rate of 800€.
Distribution of hourly rates for freelance UX designers according to Gulp
Additional Considerations
A fair rate reflects your skills, experience, and value proposition while remaining competitive in the market, and covering your cost as well as your entrepreneurial risk.
When setting your rate, it’s essential to consider your education, experience, and expertise as well as the region, industry, and type of company you’re working with. For example, freelancing for a large corporation in a major city like Munich may command a higher rate than working for a small start-up in a rural area. According to the UX Design Report 2023 by Konzepthaus, the highest-paying industries are logistics, medical technology, and energy. The worst-paying industries are telecommunication, mobility, and real estate. If you work for an agency or a recruitment company, they usually take a share of 5-20% of your daily rate as commission.It’s also important to keep in mind that once you’ve established a price with a customer, it can be hard to raise it. You will need good arguments, as to why your design work is more expensive today than it was yesterday.
As a freelancer, you have higher risks than an employee, and it’s essential to take appropriate precautions. This includes cash savings for hard times (3-6 months income), sufficient savings for retirement, and reasonable insurance.
Disclaimer: I have written this article based on my experience and to the best of my knowledge. However, I take no responsibility for the completeness and correctness of the information and sample calculations. If you spot any errors, please let me know.
]]>https://www.jroehm.com/2023/04/16/how-much-should-i-charge-as-a-ux-freelancer-in-germany/feed/0Experiences and Learnings from the d.MBA Course 2021
https://www.jroehm.com/2021/11/06/experiences-and-learnings-from-the-dmba-course-2021/
https://www.jroehm.com/2021/11/06/experiences-and-learnings-from-the-dmba-course-2021/#commentsSat, 06 Nov 2021 14:05:26 +0000https://www.jroehm.com/?p=22939What the d.MBA is
The d.MBA is an online business education course made specifically for designers. Its goal is to equip designers with fundamental business skills so they can incorporate business thinking into their work and ultimately help companies to be more successful.
How it works
It’s a 6-week online course that blends self-paced learning, working on practical assignments, and peer feedback with a structured schedule and clear deadlines.
Weekly schedule of the d.MBA course
In practice, this works as follows: Every Monday morning the instructors unlock new video content and the assignment for this week. Everyone can decide for themselves when to look at the new course material and work on the assignment. On Fridays, there’s a weekly call with a cohort of 30 international students to discuss the assignment and ask questions. Submissions are due on Sunday evening. After the deadline, students and mentors give feedback on the assignments and move on to the next module.
In addition, and I especially liked this, there is the #cafeteria channel on Slack. Every other week, the members of the channel are randomly paired and prompted to meet each other in a virtual coffee break. This is a great opportunity to meet fellow d.MBAers from all around the globe and get to know them on a more personal level.
My work-life-balance during the course
The d.MBA website states that the program requires a workload of 10-12 hours per week. I started tracking my time from week two onwards and needed 11-14 hours (⌀ 12.5h). I put a bit more time into the d.MBA than necessary because I enjoyed the modules and figured that I’d also learn more. As explained above, the program adheres to a rigid schedule with little free time in between the modules. This can be stressful but at the same time holds everybody accountable and makes sure that everyone moves along at the same pace. Having said that, the d.MBA organizers know that “Life happens” and the course is not the most important thing in the world. Therefore every student has two wild cards, which they can use to submit a deliverable later.
My time investment for the d.MBA: a bit during the week, a lot on Fridays and Saturdays but a free Sunday
For me, it was challenging to make time for the d.MBA during workdays and I didn’t want to spend my entire weekend at the desk. Fortunately, being a freelancer allows me a four-day workweek (which I can highly recommend!). For most modules, I took one or two evenings during the week to look at the provided material and then worked on the assignment for a few hours on Fridays and Saturdays. I usually tried to submit my work by Saturday afternoon to enjoy a free Sunday, which proved to be a good work-life balance for the 6 weeks of the course.
What I learned
Businesses are also designed
In the last few years that I have been working as a UX designer, I have learned that business decisions shape the user experience of a product or service more than aesthetics, usability or technology ever can. With this in mind, it only makes sense to view a business decision as a design decision. However, I just never thought of it that way. In the d.MBA program I learned that businesses are also designed and that the approach of shaping a business is not too far from the design process. It involves researching, prototyping, testing, and iterating. In which market a company competes, the position in the value chain, the business model … these are all design decisions and they need careful consideration and iteration. The understanding of business concepts empowers us, designers, to not only design better products but also help to design better companies, too.
The understanding of business concepts empowers us, designers, to not only design better products but also help to design better companies, too.
There are many tools and methods for business design
The d.MBA follows a common thread from understanding markets and trends on a high level, all the way to coming up with useful metrics to measure success. Similar to the design process there are proven tools and methods for each step along the way.
Some of the tools and methods for business design
For example, we can use the Competitive Arena and competitor research to understand the bigger context in which a business is embedded. A Value Chain Analysis helps to understand who else, besides customers, a business is designing for. From there, the Business Strategy Framework supports making strategic decisions on goals, places, and activities to gain a competitive advantage. Of course, most businesses exist to make money and by using the BMI Framework and Ecosystem Map, we can design a structured business model. Similar to the double-diamond design process, it’s key to go wide before going deep. This means, coming up with many different possible business models, identifying the riskiest assumptions, and then designing a series of experiments to find the best model. This is also where numbers and mathematics come into play. We can use model calculations to test the feasibility and viability of our ideas, estimate relevancy for the business, and measure impact. This doesn’t have to be rocket science and a simple spreadsheet with basic arithmetic operations can be sufficient as a prototyping tool. Last but not least, business and design metrics help us to gain quantitative insights, align a team around a common goal, and quantify the impact of our decisions. The Metrics Canvas mitigates the risk of over-optimizing for one metric and helps to balance goals while Hypothesis Driven Design turns design into a systematic approach to solve (business) problems.
A clear goal and strategy are key
“You can’t climb two mountains at the same time. If you try to do both, you’ll be stuck in the valley.”
Alan Faljic, Founder of the d.MBA
This quote resonated with me, not only because I love to climb mountains but also because I have seen many projects lack a clear goal. This results in a lot of uncertainty, delays, mediocre results, and above all little value for the users and the business. It’s crucial to set a clear goal and then come up with a corresponding strategy that guides decisions and activities to reach it. As simple as this sounds in theory, it is difficult to put into practice. Business and product strategy requires hard choices and involves trade-offs. Doing one thing means that you can’t do another thing. Climbing one mountain peak means that you’ll miss out on the others – but at least you’re not stuck in the valley!
Successful companies know this and follow a well-thought-out strategy to reach their goal. In one of the two case studies of the d.MBA we looked at the alternative protein market and the different approaches that companies are taking to create alternative meat products. For example, the mission of Impossible Foods is to “turn back the clock on global warming and restore biodiversity by ending the need for animal agriculture”. Their strategy is to target the huge global market of flexitarians and meat lovers (as opposed to the much smaller market of vegetarians and vegans) by offering them an alternative product that they prefer over real meat, but which has a much smaller environmental footprint. As a trade-off, they make a product that is highly processed and unhealthy. They are criticized for doing this but it’s a perfectly valid strategy to reach their goal of minimizing harm to the environment – and besides it’s a good business.
How I plan to apply my business knowledge
As a freelance UX designer, I’m usually hired by clients to do exactly that: design the user interface and user experience of a digital product. I’ve been doing this for many years and I feel confident to answer “How can we create a great user experience?”. My feeling is that this is true for the entire industry. With many established methods, tools, and best practices the “How?” isn’t such a difficult question anymore. “What should we build?” and more importantly “Why should we build it?” move to the foreground and those questions can’t be answered with personas or wireframes. At the same time, these are the questions that I see especially bigger companies struggling with. While products are designed very thoughtfully, the business context around them is often not.
In my next projects, I want to help design the business context in addition to the product itself. Maybe this means asking lots of difficult questions or using the methods I learned in the d.MBA. As mentioned above, setting a clear goal and designing a corresponding strategy seems the most critical but also applicable to me. This includes coming up with useful metrics to measure the value of a product, feature, or idea against that goal.
Since I don’t know what my next project is going to be, I can’t be more specific than that. However, if you need a business-minded freelance UX designer in your company, you’re welcome to hire me and hold me accountable for what I wrote above.
Interested in the d.MBA and a 600€ discount?
If you’ve read this far, you’re probably interested in the d.MBA. To learn more, and/or get a 600€ discount write me an email before (!) you apply.
]]>https://www.jroehm.com/2021/11/06/experiences-and-learnings-from-the-dmba-course-2021/feed/2Launch Multiple Apps at Once with macOS Automator
https://www.jroehm.com/2021/04/06/launch-multiple-apps-at-once-with-macos-automator/
https://www.jroehm.com/2021/04/06/launch-multiple-apps-at-once-with-macos-automator/#commentsTue, 06 Apr 2021 20:25:44 +0000https://www.jroehm.com/?p=22836As a Freelance UX Designer, I use the same computer for work and personal stuff. This means that I open all work-related apps one by one in the morning and also close them one by one in the evening. Not a big deal but still annoying and unnecessary. Luckily, there is a neat solution: using macOS Automator to create an app to launch other apps.
Add the command “Launch Application” from the library and select an application from your computer. Repeat this for all the applications that you wish to launch
Save the application and give it a name, e.g. “Work”
Of course, you can also create an app to quit all of your work-related apps. Create a new app in Automator, select the command “Quit All Applications” and add the ones that you do NOT want to quit.
Add an icon (optional)
If you want to make the Automator app look nice, you can use any graphic in the ICNS, PNG or PDF format as an icon.
Double-click your newly created app and see the magic happen: all of your configured applications will automatically open one after another.
Since all apps are automatically indexed by Spotlight, you can also launch it via the keyboard: press cmd + spacebar to open Spotlight and then type the name of your app.
P.S. Thanks to Michael Ognew for the original inspiration for this little “Life Hack”
]]>https://www.jroehm.com/2021/04/06/launch-multiple-apps-at-once-with-macos-automator/feed/3The UX Community in Munich
https://www.jroehm.com/2021/03/04/the-ux-community-in-munich/
https://www.jroehm.com/2021/03/04/the-ux-community-in-munich/#commentsThu, 04 Mar 2021 20:56:33 +0000https://www.jroehm.com/?p=22773There are a large number of UX companies in Munich and it’s no surprise that the local community reflects this. I tried to collect all groups, meetups, events, etc that are related to UX design and based in the Bavarian capital.
]]>https://www.jroehm.com/2021/03/04/the-ux-community-in-munich/feed/1How to Find Jobs as a UX Freelancer
https://www.jroehm.com/2021/01/16/how-to-find-jobs-as-a-ux-freelancer/
https://www.jroehm.com/2021/01/16/how-to-find-jobs-as-a-ux-freelancer/#respondSat, 16 Jan 2021 19:54:04 +0000https://www.jroehm.com/?p=22692Being a Freelance UX Designer is great but finding projects can be daunting. In this article, I share some helpful links as well as tips and tricks to get your next gig – especially in or around Munich.
Recruitment Agencies
One easy way to find work is to get in touch with a recruitment service provider. They will save your profile in their database and contact you as soon as they have a suitable request. This is a good way to work for big corporations, who usually don’t hire freelancers directly. The recruitment agency will take care of most of the paperwork and serve as a middleman between you and the client. They earn money by charging the client a higher daily rate than what they pay the freelancer. Here are some recruitment agencies that place freelance designers on projects.
Freelance networks are hybrid organizations that blur the lines between design and recruitment agencies. They either provide jobs for individuals (similar to a recruitment agency) or assemble cross-functional teams to work on a client project from start to finish (similar to an IT company or design agency). In any case, they have an extended network of specialists from all kinds of disciplines. There is a growing number of freelance networks with ties to Munich:
Small innovation consulting agency from Munich with a large network of “expert players” to configure the perfect team for each project
Online Platforms
Besides the professional social networks LinkedIn and Xing, there are online platforms that focus specifically on connecting companies and freelancers. For example, Fiverr, Upwork, Freelancermap, Bettertalkto, UX Remote Talent, and Freelance.de. Sometimes the matching process of these platforms is manual, sometimes aided by algorithms. In most cases, you can set up a profile and also view existing projects and requests. It’s also interesting to use those websites to do research on how other UX freelancers market themselves and what their daily rate is.
If you don’t want to look at (and sign up to) every platform, you can also try searching for “Freelance UX” on Google Job Search. The results will include jobs from some of the mentioned platforms and other websites.
9am not only aggregates jobs from various sources but also offers basic CRM functionality, helpful resources, and a (Slack) community.
Cold Acquisition & Networking
There are over 450 companies in Munich, that design and develop digital products. They come in all shapes and sizes from small startups to international corporations. Many of them have an internal UX design team but often there is more work than they can handle. As a proactive UX freelancer, you can pick the companies that interest you the most, and approach them directly. This is a bit cumbersome, and might not lead to a project directly but it doesn’t hurt to put yourself on their radar. Who knows, maybe they will have a job opportunity in the future and remember you? You can use the interactive map of UX companies in Munich to get an overview and look for interesting firms.
Another great way to get to know people and look for jobs is to become part of the local community. There are plenty of groups, meetups, and events in Munich that revolve around topics related to user experience design. Going there and meeting people is always a good idea. If you’re up for it, you can even give a talk at a meetup and share your knowledge.
Slack Communities for designers are a nice way to network with other designers, developers, and creators all around the world. They often have #jobs and/or #freelancer channels, where you can look for your next gig.
]]>https://www.jroehm.com/2021/01/16/how-to-find-jobs-as-a-ux-freelancer/feed/0Insights on UX Companies in Munich
https://www.jroehm.com/2020/05/01/insights-on-ux-companies-in-munich/
https://www.jroehm.com/2020/05/01/insights-on-ux-companies-in-munich/#commentsFri, 01 May 2020 18:47:55 +0000https://www.jroehm.com/?p=22404When I look at the map of UX Companies in Munich, I’m fascinated by how big and diverse the local user experience design scene is. I played around with Data Wrapper to create charts and gain new insights into the many companies that create digital products and services in the Bavarian capital.
Please keep in mind that the statistics below are based on a public Google Doc that anyone can edit without any editorial process. For example, the document contains companies that practice UX design in the broadest sense. They might employ an army of designers or occasionally hire a freelancer. Since the data might be outdated (latest update in January 2021), incomplete, or even wrong you should take it with a grain of salt.
Munich is the city with the most DAX companies and home to many global players, especially in the tech industry. Many of these firms have realized that good design is good business and are therefore building up UX competency inhouse. However, the demand for good UX design is far greater than what they can handle themselves. This creates business opportunities for a variety of service providers such as IT companies, recruiting firms, and design agencies.
A second group that fundamentally shapes the local UX scene are the startups. According to some rankings, Munich is the second most important startup city in Germany. For many of these young companies, user experience plays a crucial role and they’re employing designers from the very start.
The chart above shows that companies of any type come in many sizes. On the one hand, it’s not a surprise that most industrial and media companies are big enterprises, while startups are comparatively small. On the other hand, IT companies, agencies, and consultancies range from a few people to many hundred employees. Please note that size, in this case, refers to the global size of a company and not only their Munich office.
As we can see from the first chart, design agencies make up the biggest portion of the local UX scene. They’re incredibly diverse in regard to their size, organization, and the work they focus on. In addition to global agencies with an office in Munich, there are also many small and independent design studios.
The ratings from kununu are an interesting data point to get an impression on what it’s like to work for a certain company. The charts above visualize two dimensions: the kununu rating on a scale from 1-5 and the count (how many people have rated the company). Most companies have between 3-5 points and fewer than 500 ratings. Bigger companies usually have more ratings but also lesser points.
What’s interesting about this list is that six of these companies are startups and most of them are small or medium size. Looking closer, the data suggests that a medium-sized startup is the best place to work for a UX designer in Munich.
It’s no secret that lots of design-related companies are being acquired, especially by management consultancies. This global trend can also be observed in Munich but the majority of design agencies remain independent. Please note that “acquired” in this case does not necessarily mean that a company is fully owned by another company. It can also mean that they sold only a smaller part of their business.
When we look at the size of acquired design agencies, we can make an interesting observation: most of them employ more than 50 people. One reason might be a fundamental problem with the agency business model that makes it especially hard for bigger agencies to sustain a profitable business.
]]>https://www.jroehm.com/2020/05/01/insights-on-ux-companies-in-munich/feed/3Syncing Calendar and Contacts between Mac and Android via OwnCloud
https://www.jroehm.com/2016/04/02/syncing-calendar-and-contacts-between-mac-and-android-via-owncloud/
https://www.jroehm.com/2016/04/02/syncing-calendar-and-contacts-between-mac-and-android-via-owncloud/#commentsSat, 02 Apr 2016 13:42:25 +0000http://www.jroehm.com/?p=1127I’ve recently installed OwnCloud 9 to sync my calendar and contacts between my Mac and Android phone. I didn’t want to use iCloud or Google anymore and OwnCloud promised to be a great alternative. The good news: it works really well. The bad news: getting the synchronization up and running is not always as straightforward as expected. I’ll share how I did it, along with some tips and tricks in this blog post.
Installing OwnCloud
Obviously, you will need to install OwnCloud first. There is lots of good documentation on this, so I won’t cover the installation here. However, if you’re trying to install OwnCloud at the German webhoster Strato, take a look at my blog post on how to install OwnCloud 9 at Strato (German only).
Installing the OwnCloud apps
In addition to the default OwnCloud installation, you need to install the apps for calendar and contacts. This can be done in the main menu (+ Apps) in the upper left part of the screen. It’s only a matter of a few clicks. Once the apps are installed, you’re already able to use the calendar and adress book via the web interface.
Setting up CardDAV and CalDAV accounts on OS X
To sync contacts and events with your Mac you need to create a new CardDAV (contacts) and a new CalDAV (calendar) account.
Go to System Prefrences > Internet Accounts > Add Other Accounts and select “CardDAV” account.
Choose account type “Manual” and enter your username and password for OwnCloud.
If you have installed OwnCloud in the root folder of your webserver, copy and paste the CalDAV URL into the server adress input field. You can find the CalDav URL for your calendar in the OwnCloud app, you’ve just installed. Click on the cog wheel icon in the bottom left part of the screen and make sure to copy the iOS/OS X address.
Repeat these steps and create a CalDav account to sync your calendar.
If everything works fine, the accounts show up in the calendar and contacts application on your Mac. You’ll be able to sync data in the same way as with iCloud and Google.
If you’ve installed OwnCloud in a sub directory on your web server, OS X will have trouble finding the proper sync URL. In this case it displays the following error:
Accountname/Password could not be verified.
To work around this, add the following lines to your .htaccess file to redirect to the correct URL (instead of “owncloud” enter your OwnCloud subfolder):
Then create new CardDAV and CalDAV accounts, as described above, and enter your URL without any subfolders (e.g. http://www.your-domain.com) as the server address.
To transfer an entire calendar from iCloud to OwnCloud, export the iCloud calendar and import it to your OwnCloud calendar.
To transfer all of your contacts, simply select all of them and drag them into the OwnCloud address book.
Syncing with Android
To sync your Android device you need to install CardDAV and CalDAV client apps. I’m using CardDav-Sync free and CalDAV-Sync, which work very well.
Download the apps
Choose CalDAV / CardDAV respectively
Enter your credentials and URL (same credentials as for OS X, see above)
Choose your settings, e.g. the synchronization interval
Congratulations, you’re now able to sync all of your calendars and contacts between you Mac and your Android phone via OwnCloud. You’re one step closer to completely own your data!
]]>https://www.jroehm.com/2016/04/02/syncing-calendar-and-contacts-between-mac-and-android-via-owncloud/feed/3OwnCloud 9 bei Strato installieren
https://www.jroehm.com/2016/03/30/owncloud-9-bei-strato-installieren/
https://www.jroehm.com/2016/03/30/owncloud-9-bei-strato-installieren/#commentsWed, 30 Mar 2016 12:42:17 +0000http://www.jroehm.com/?p=1120Kürzlich habe ich OwnCloud 9 bei Strato installiert und bin dabei auf den folgenden Fehler gestoßen:
Error while trying to create admin user: Failed to connect to the database: An exception occured in driver: SQLSTATE[HY000] [2002] Can’t connect to local MySQL server through socket ‘/tmp/mysql.sock’ (2) owncloud strato
Nach einigem vergeblichen Trouble-Shooting habe ich dann mithilfe der Strato FAQs festgestellt, dass anstatt “localhost” die Server-Adresse “rdbms.strato.de” verwendet werden muss – und schon geht’s.
]]>https://www.jroehm.com/2016/03/30/owncloud-9-bei-strato-installieren/feed/5A Simple Guide to Use OSC in the Browser
https://www.jroehm.com/2015/10/18/a-simple-guide-to-use-osc-in-the-browser/
https://www.jroehm.com/2015/10/18/a-simple-guide-to-use-osc-in-the-browser/#commentsSun, 18 Oct 2015 17:15:23 +0000http://www.jroehm.com/?p=1048
In this article, I’ll explain how you can send and recieve OSC messages with your browser. We’ll use an open source app to send OSC messages from a smartphone to the browser via Wi-Fi.
A little background
Open Sound Control (OSC) is a protocol for communication among computers and other multimedia devices. It can be seen as the successor of MIDI. OSC is very simple, flexible and provides everything needed for real-time control of media. This may not sound very exciting at first but OSC is incredibly useful for connecting devices and creating rich multimedia experiences.
Unfortunately, no browser can recieve OSC messages out of the box. We’ll have to use node.js to recieve the OSC messages and forward them to the browser via WebSocket. node.js is basically a simple version of a web browser that doesn’t have any graphical interface and can (only) execute JavaScript code (it’s a “JavaScript runtime”). One of the benefits of node.js is the availability of countless open source libraries, called “modules”. In our case, we’ll use the “socket.io” module to enable the communication via WebSocket. The WebSocket protocoll is neccessary for two-way, realtime communication with the browser. Traditionally, via HTTP, a client sends a request to the server, which then sends some data back. There is no way for the server to send data to the client without beeing “asked” first. WebSockets allow for messages to be passed back and forth while keeping the connection open. This enables real-time gaming or chatting.
Open up the terminal and install socket.io with the help of the node.js New Packet Manager (npm):
npm install socket.io
Then install the osc-web module by Vilson Vieira, which will create the folder “osc-web” in your users root folder and enable us to send/receive OSC messages via socket.io:
git clone git://github.com/automata/osc-web.git cd osc-web/ npm install
Run the bridge app:
cd osc-web node bridge.js
You can also type in “node” and then drag an drop the “bridge.js” file directly into the terminal. This will run the file with node.js. The terminal will show “socket.io started” and a “heartbeat” from time to time.
In case you want to cancel the execution of the script, press Ctrl + C.
Send OSC from smartphone to browser
So, now we’re all set to receive OSC messages but still need some kind of software or device to send OSC messages. For this purpose, we’ll use Charlie Roberts Control App to send messages from our smartphone to the browser. It allows you to build custom interfaces with buttons, sliders, knobs etc and send OSC messages over Wifi. The app hasn’t been updated in a while and is not super-intuitive but it’s good enough and it’s free. If you want a more polished, easy-to-use app you can go for Touch OSC.
Make sure your smartphone and computer are connected to the same Wifi
Choose “Destinations” from the Apps menu, add the local IP address of your computer and port 3333 to tell the Control App where to send the OSC messages.
Go to “Interfaces” and choose one of the available interfaces
Run bridge.js with node, if it’s not already running (see step 4 above).
Open “app.html” in the “web-side” folder within the OSC-Web folder
Move a slider (or whatever) on the Control interface on your smartphone to send OSC messages to the browser. The terminal will show the messages and the latest one is also visible on the app.html site.
Congrats, you’ve successfully managed to send OSC messages from your smartphone to your browser!
What now?
Using OSC in the browser opens up a world of possibilities:
Build a web-based game and control it with your smartphone.
Connect a Wiimote to you computer with the help of OSCulator and use it to navigate through your website. This could be useful for prototyping Smart-TV apps, for example.
Build a web-app that you can control with your facial expressions via FaceOSC
]]>https://www.jroehm.com/2015/10/18/a-simple-guide-to-use-osc-in-the-browser/feed/3Social Network Visualization using Facebook and Gephi
https://www.jroehm.com/2014/10/29/social-network-vizualiation/
Wed, 29 Oct 2014 19:49:44 +0000http://www.jroehm.com/?p=977This is the visualization of my personal ‘social network’, based on my Facebook friends in early 2013. Each colored dot represents a Facebook friend and each line between two dots represents a connection. In other words, these people know each other. The bigger a dot, the more connections the person has within the network. The color indicates the number of connections from a cold blue (no connections) to a warm orange (many connections). Dots with connections attract each other and unconnected dots are pushed away. This creates the characteristic clusters. By looking at the people in each cluster, it’s really easy to identify the corresponding group. They are mostly based on location (cities and countries) as well as “common interest” in the sense of university, church or the like.
How did you do this?
I used a combination of the following tools to create the vizualization:
今回リケーブルで使用したのは、NOBUNAGA Labsさんがオンライン限定で販売していた「鬼丸改 Black Edition」です。1万円程度でしっかりと音の変化を楽しめ、音の傾向としては低音に厚みを持たせ、全体的に明るく、輪郭をはっきりさせるケーブルです。イヤーピースは「SednaEarfit Crystal」を使用しました。
]]>https://a-tlog.com/2022/08/10/%e3%80%90%e3%83%ac%e3%83%93%e3%83%a5%e3%83%bc-%e9%9f%b3%e5%a3%b0%e3%81%82%e3%82%8a%e3%80%91shure%e3%81%ae%e3%83%94%e3%83%b3%e3%83%9e%e3%82%a4%e3%82%af%e3%81%8c%e8%89%af%e3%81%84%e3%81%9e%ef%bc%88motiv/feed/01296
Index already exists

 Android Auto è un modo pratico per utilizzare determinate applicazioni del proprio dispositivo mobile quando si è a bordo. Prima di iniziare, scaricare l’app “Android Auto” da Google PlayStore.
 A questo punto sulla schermata iniziale verrà attivata l’icona Android Auto, cliccare su Android Auto. La prima volta che si utilizza l’applicazione occorre fare attenzione alle richieste del sistema sul proprio dispositivo mobile.


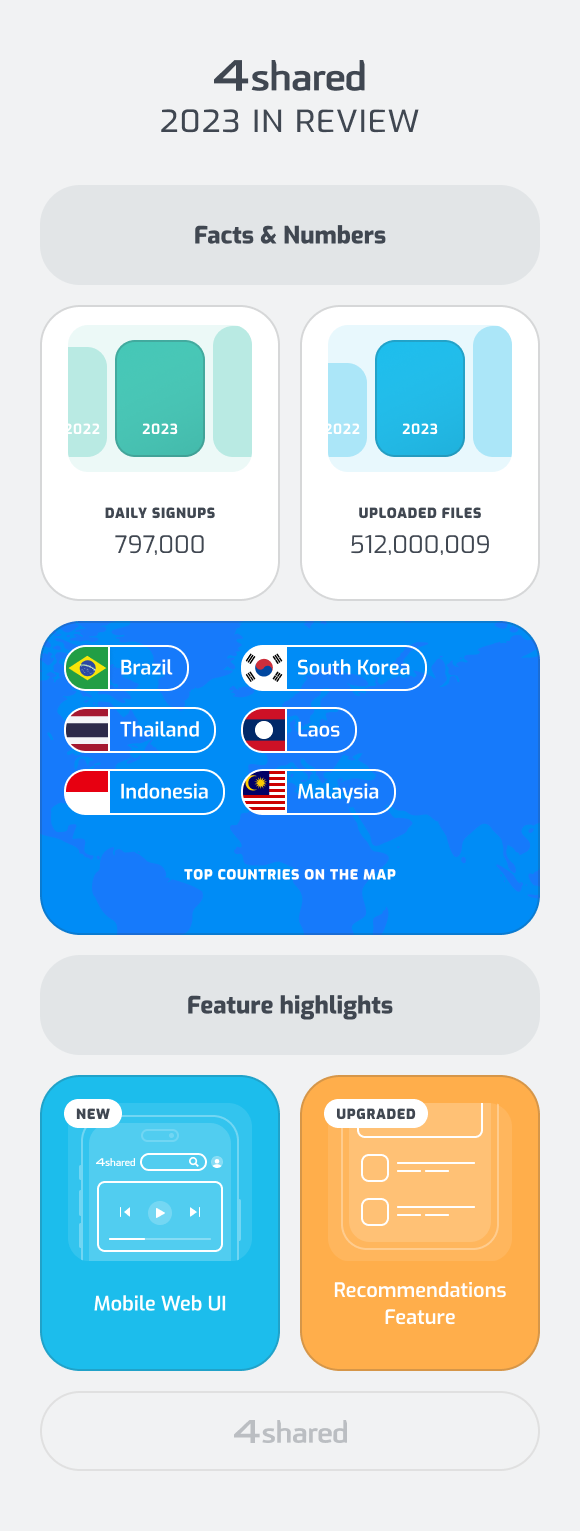
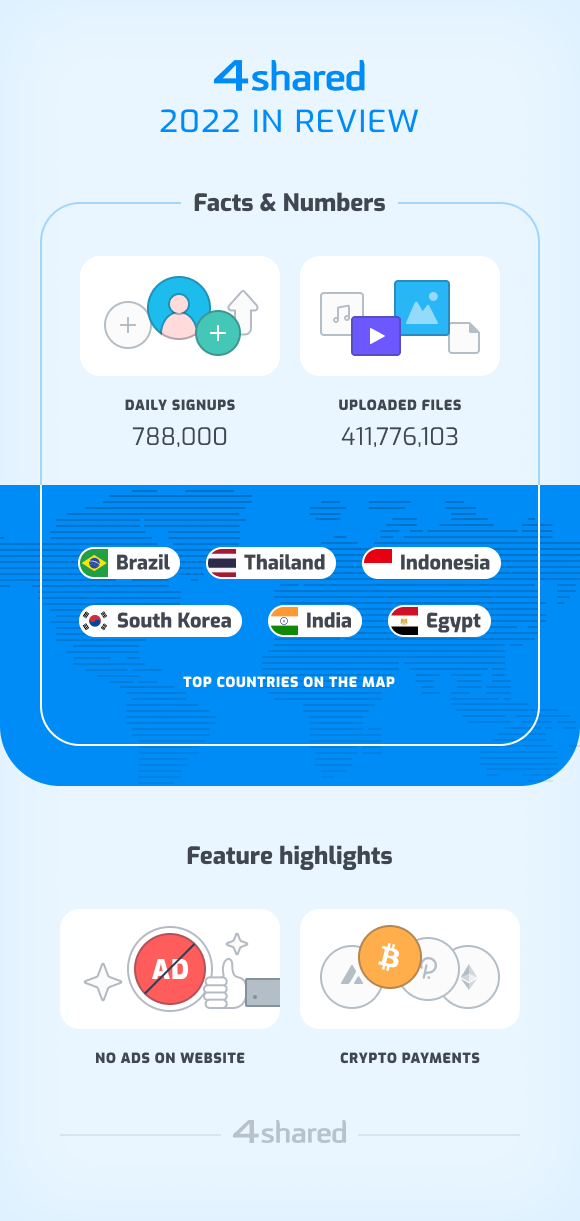

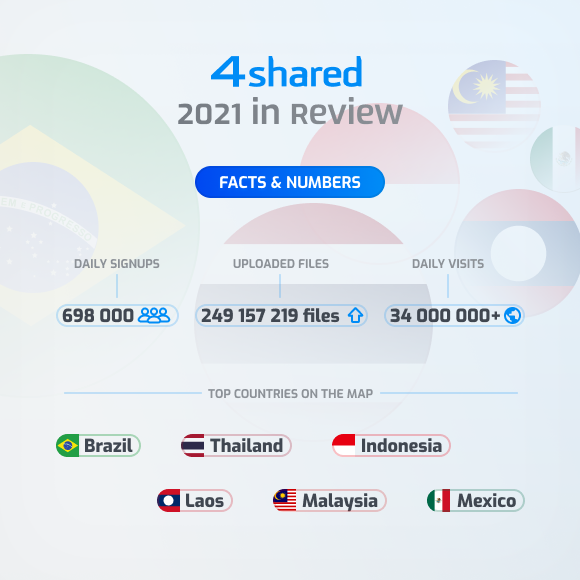


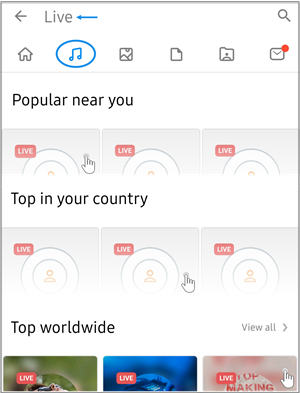
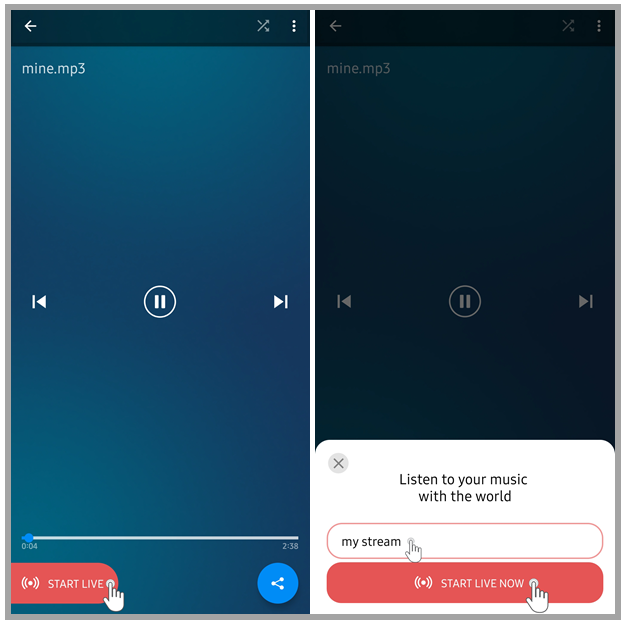
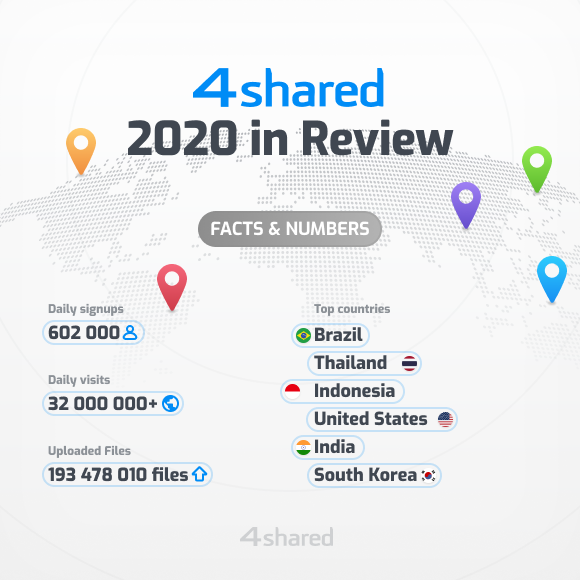
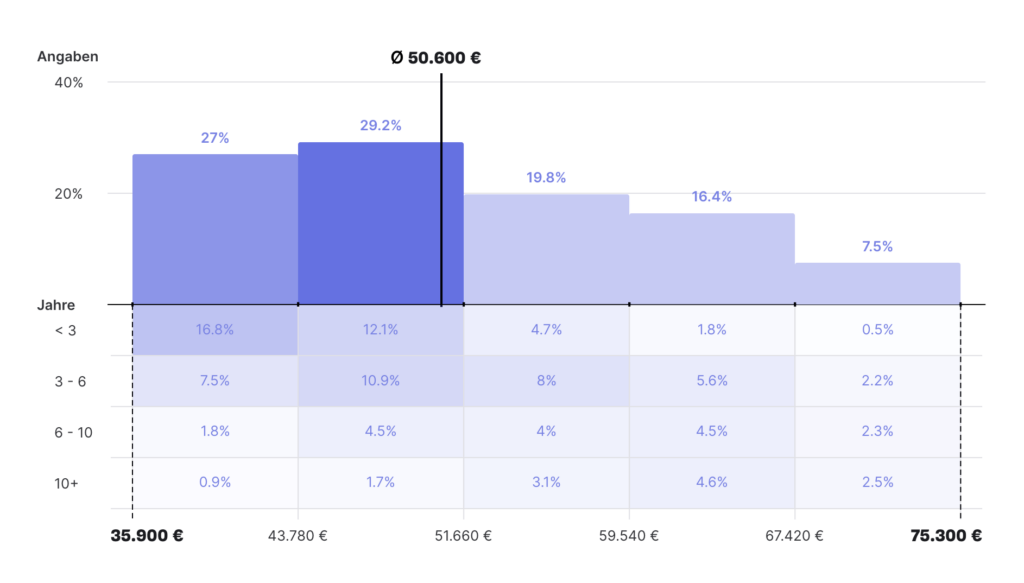
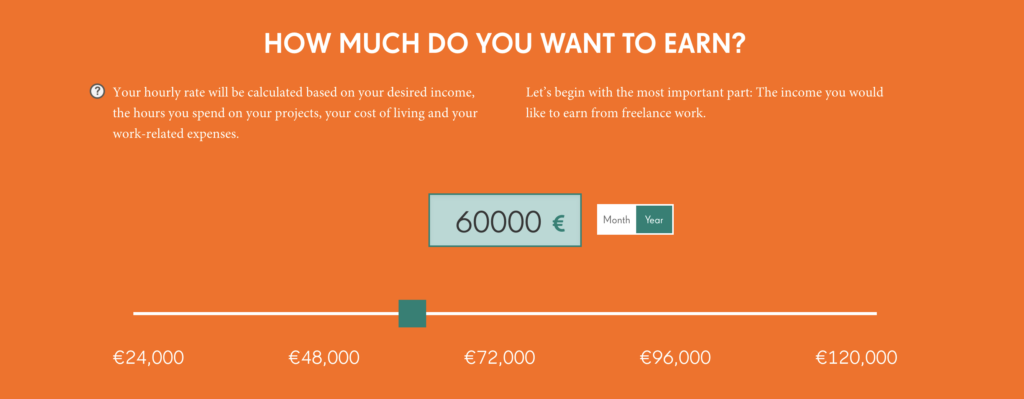

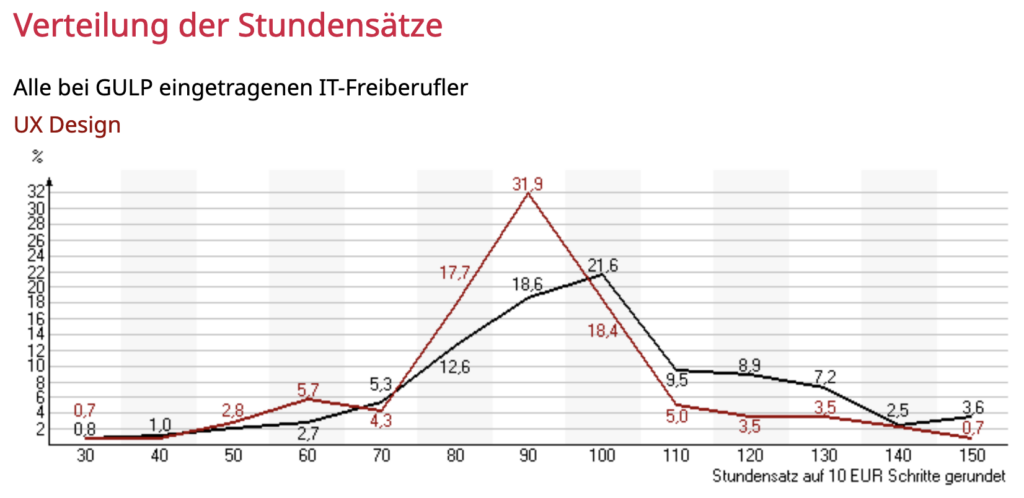
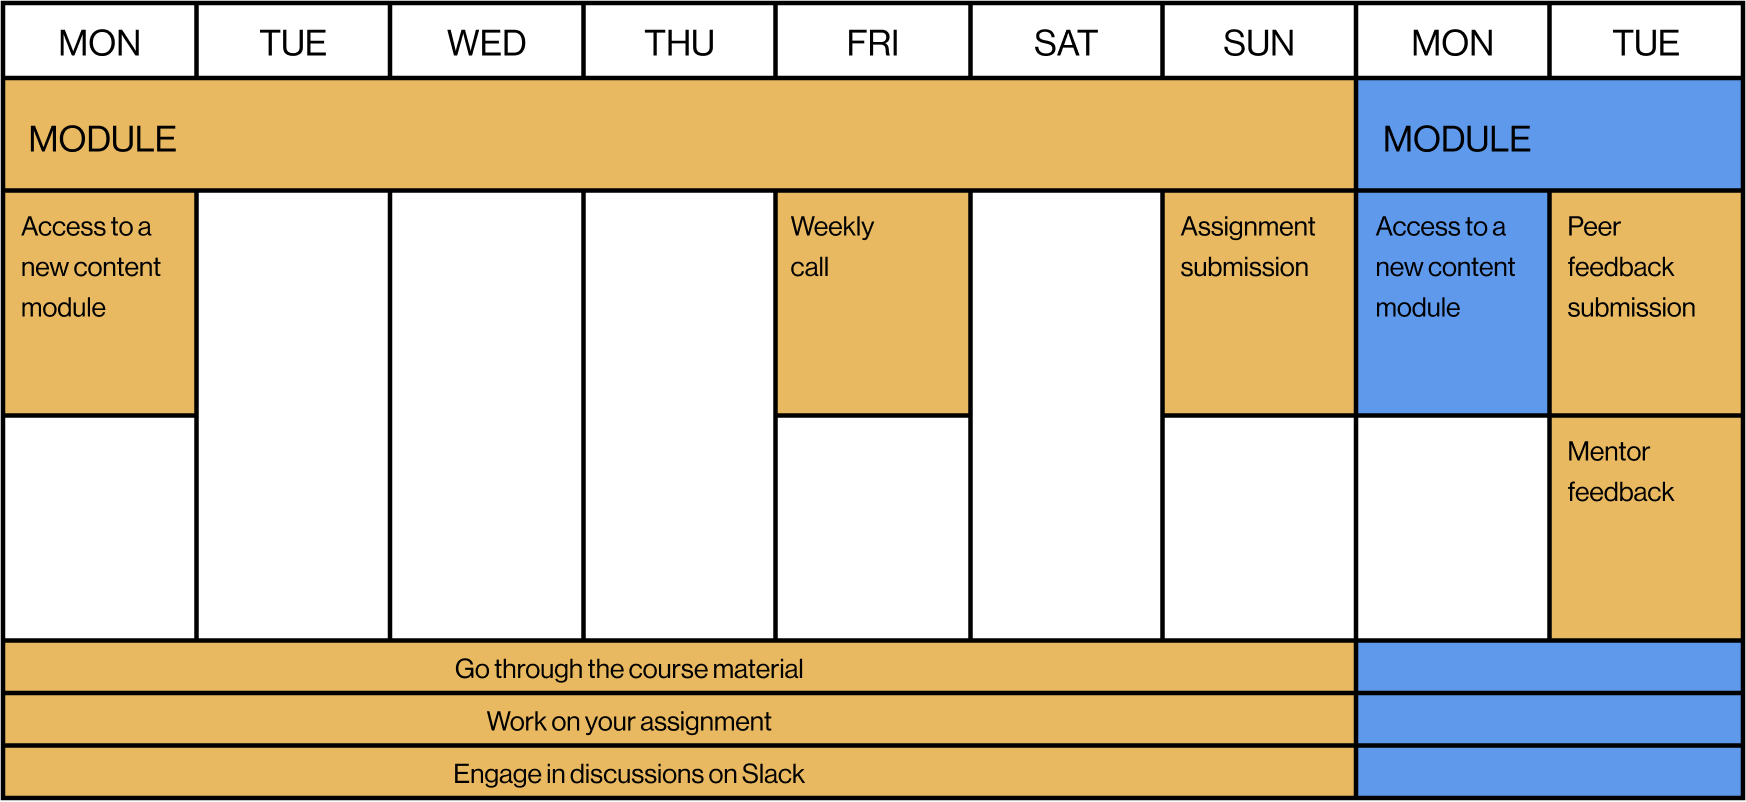

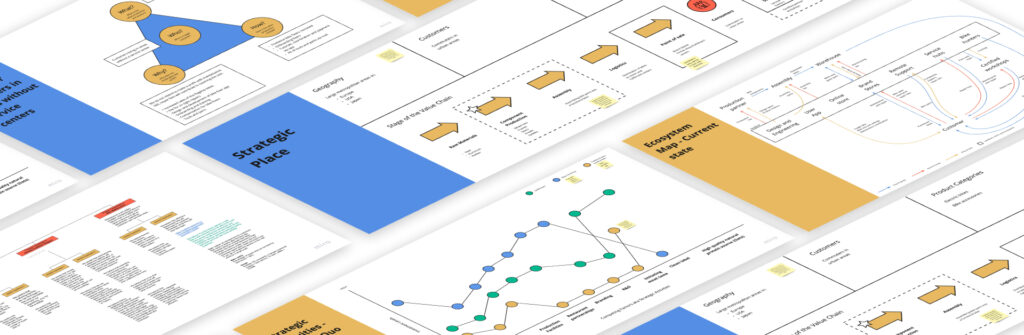
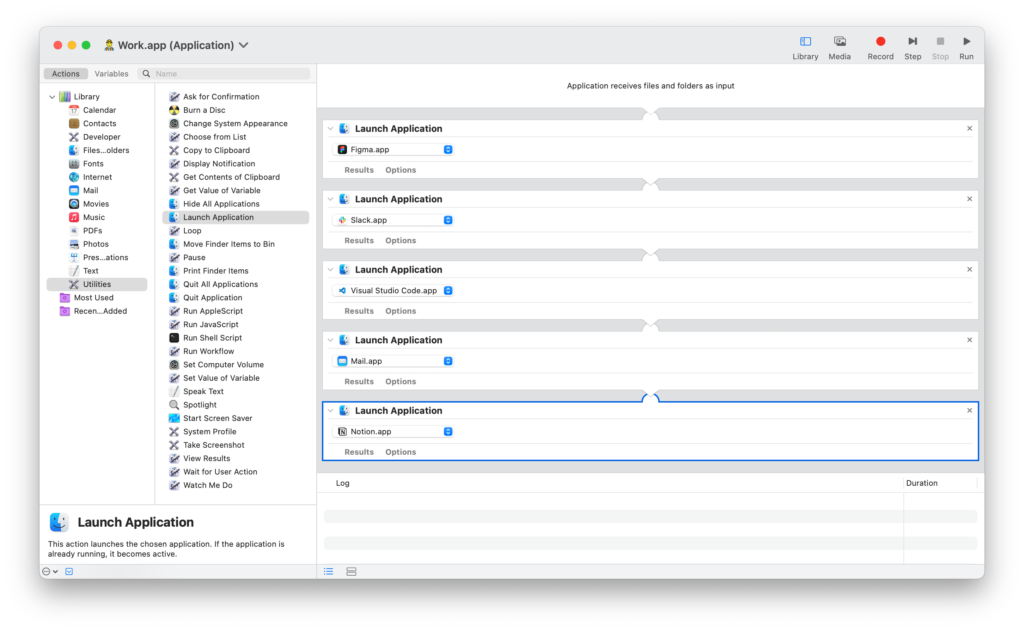
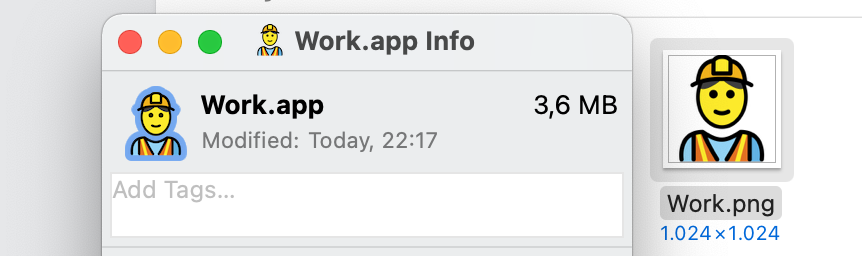


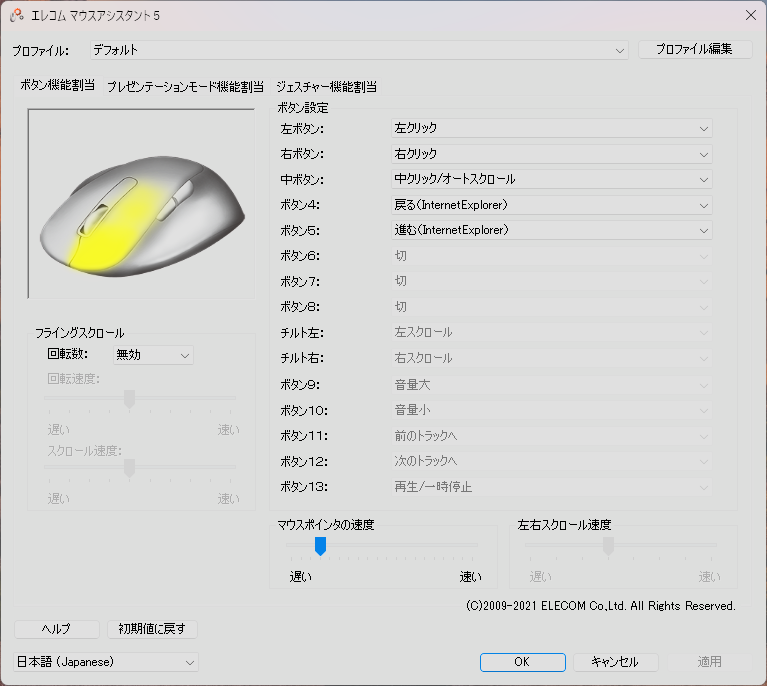


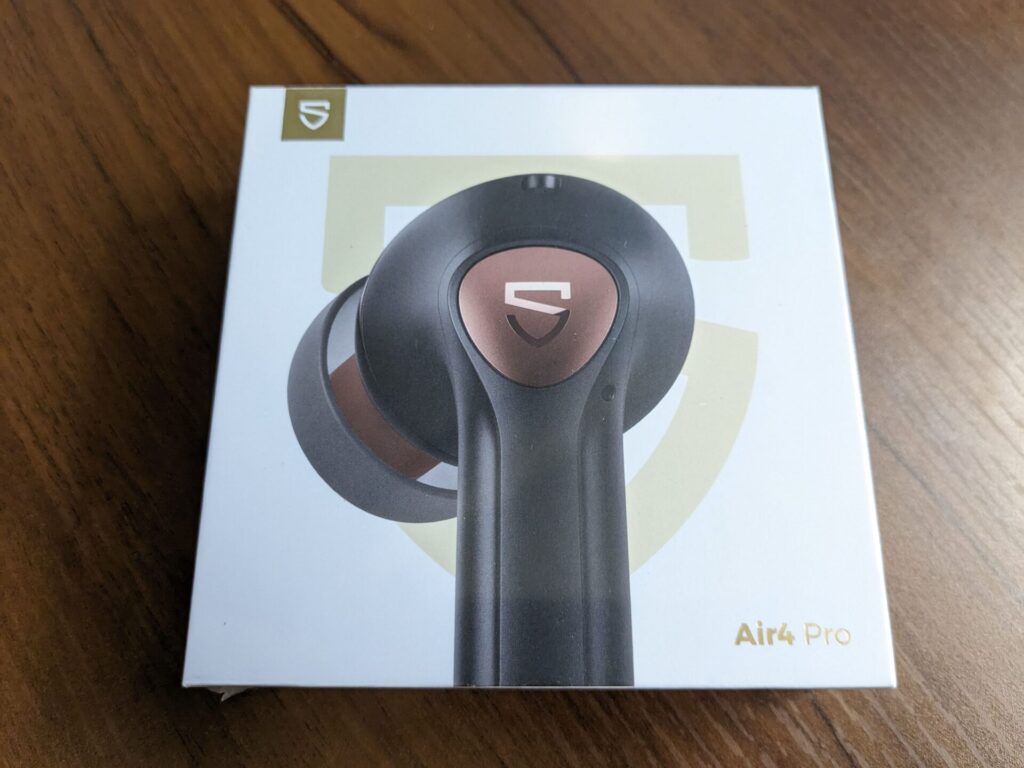


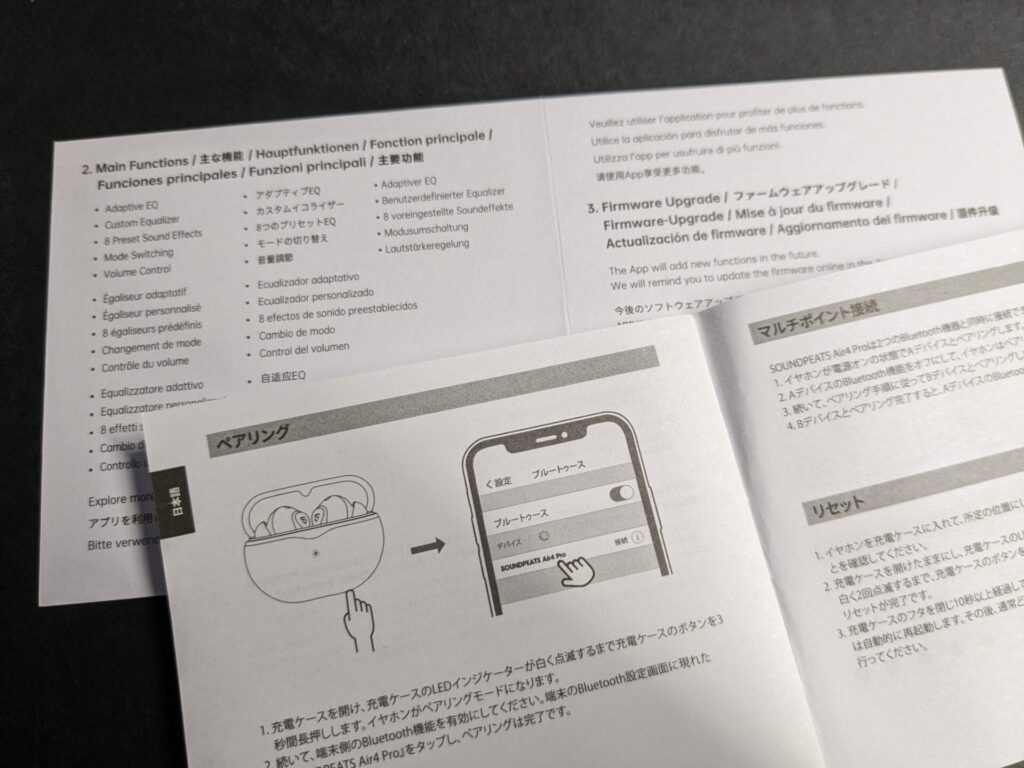
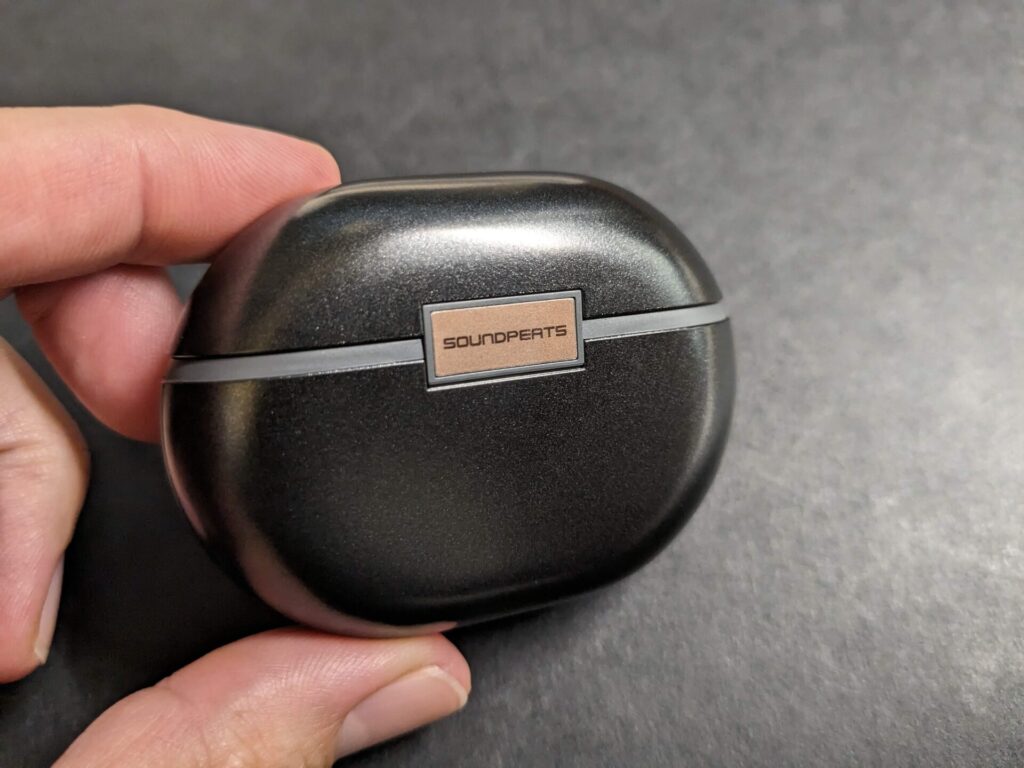


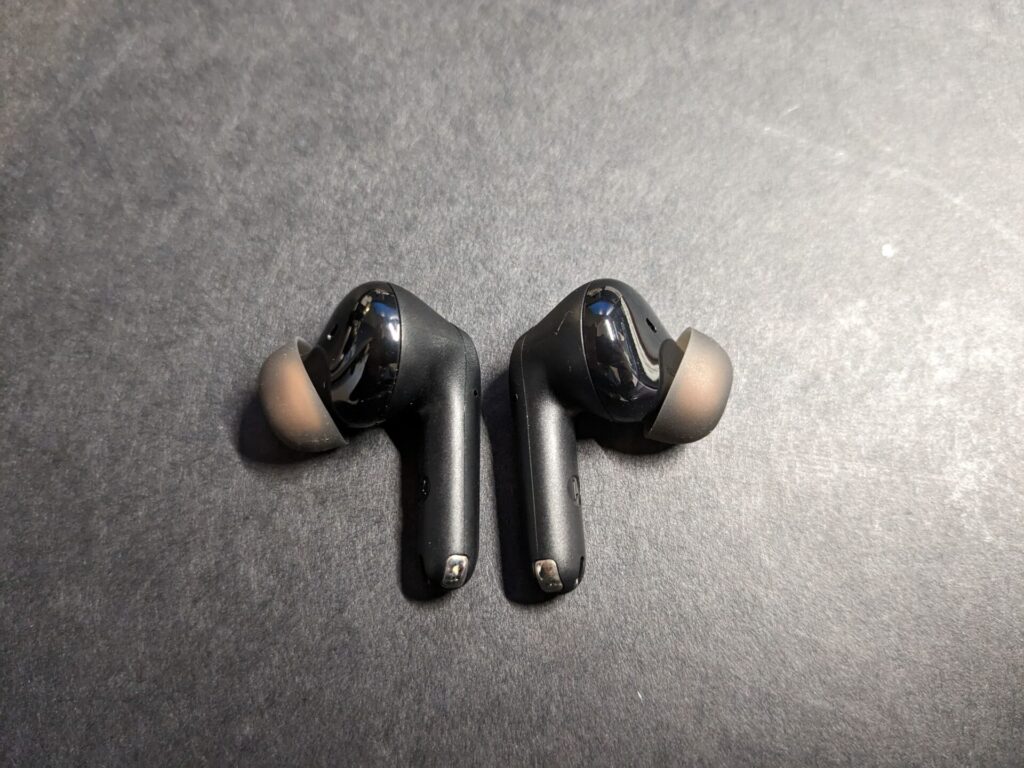


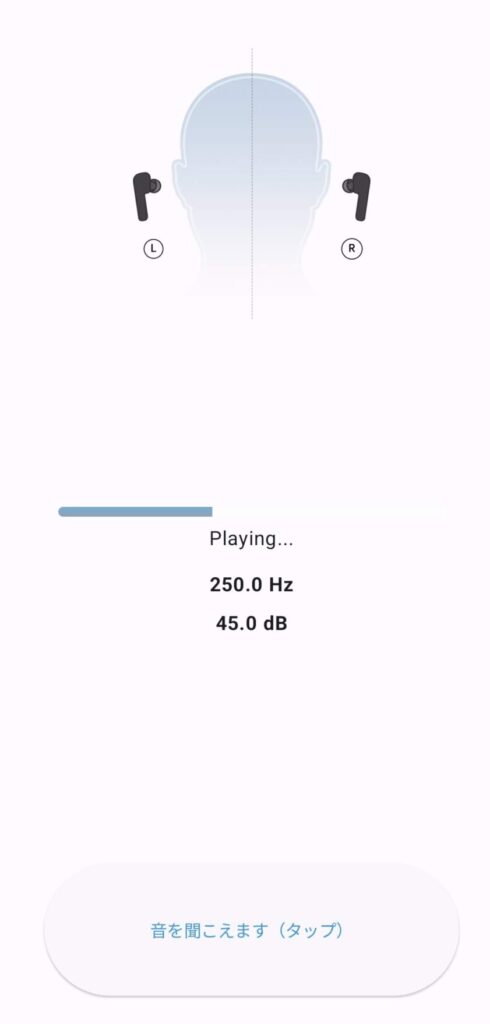
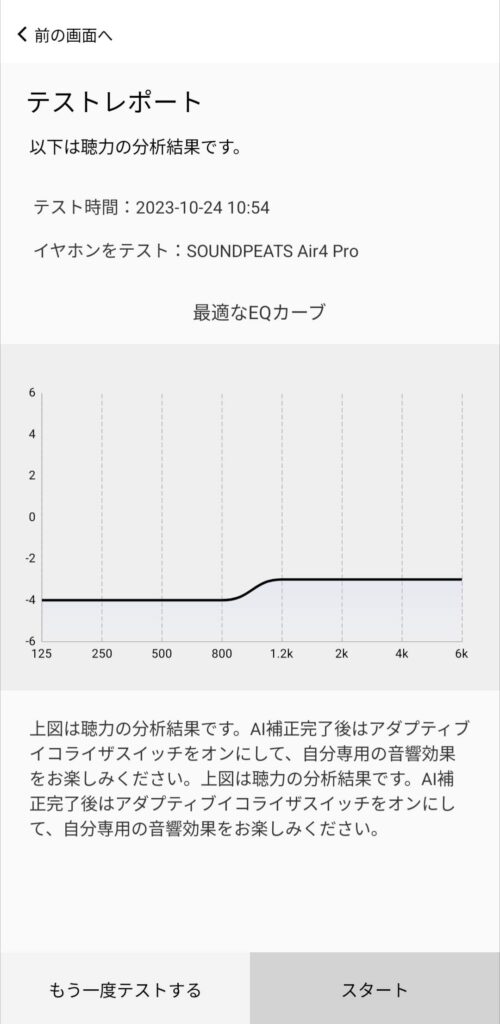


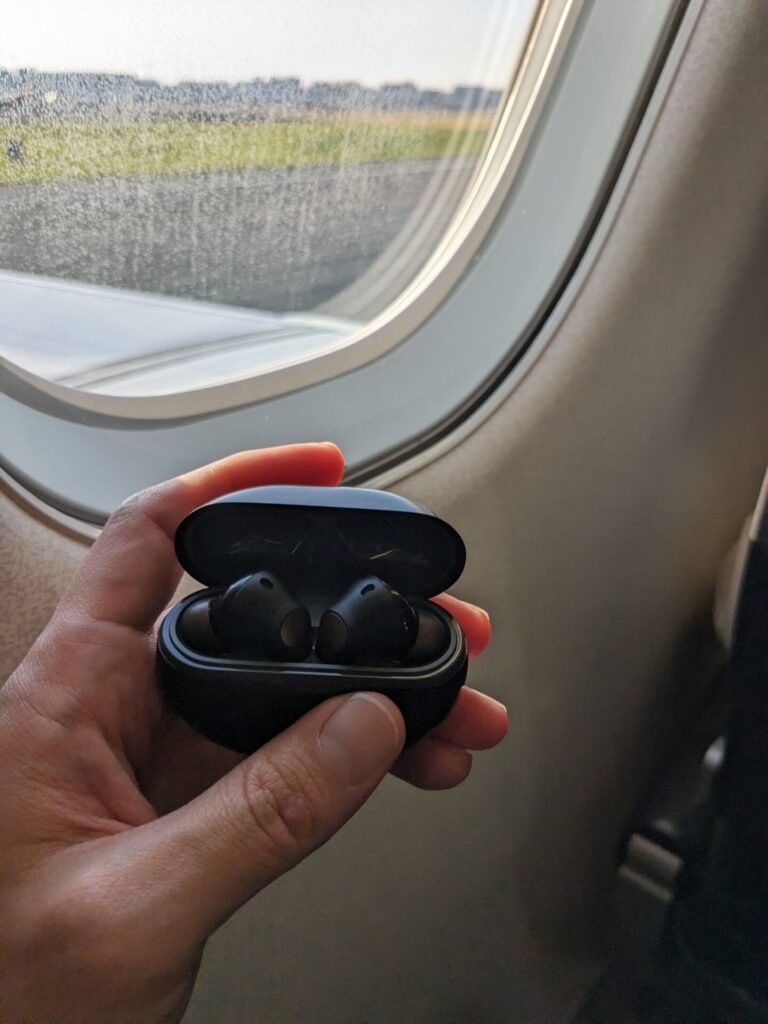
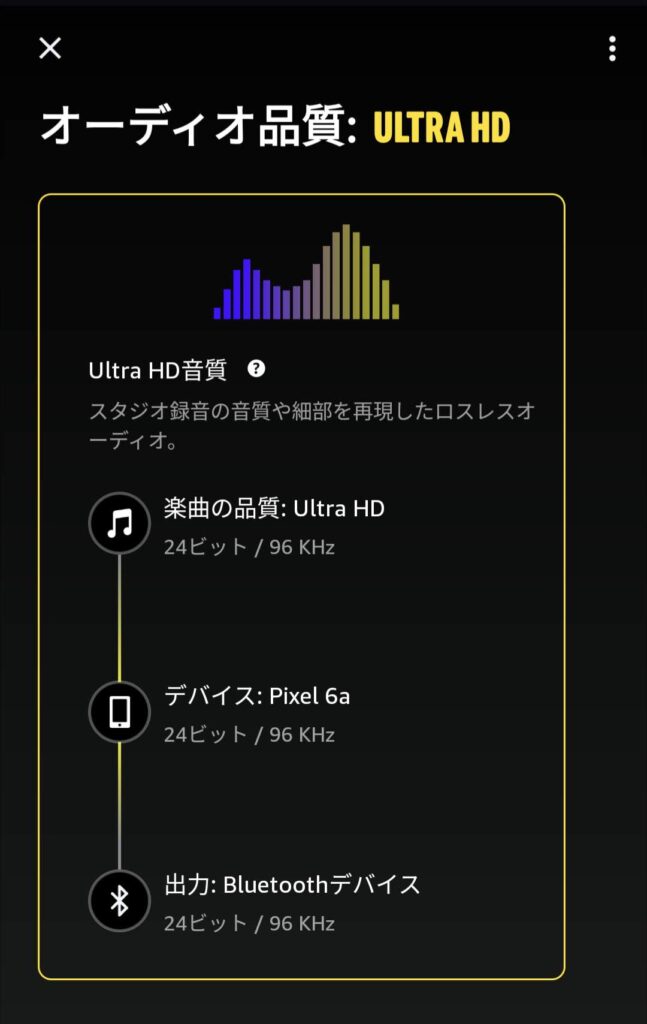


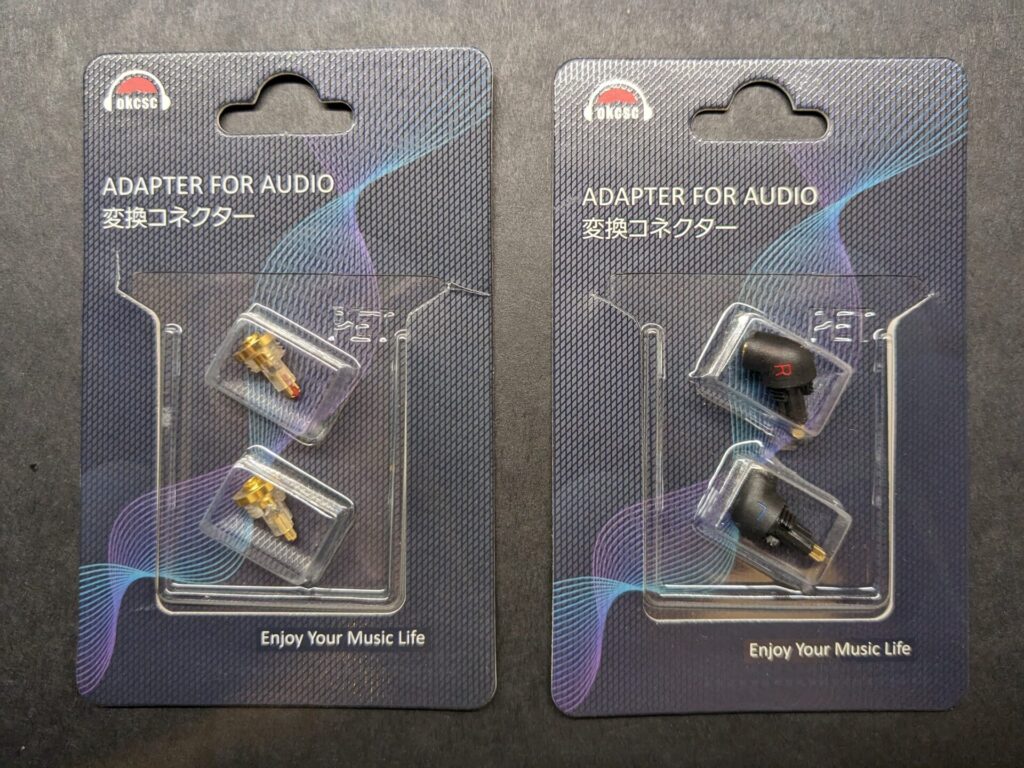
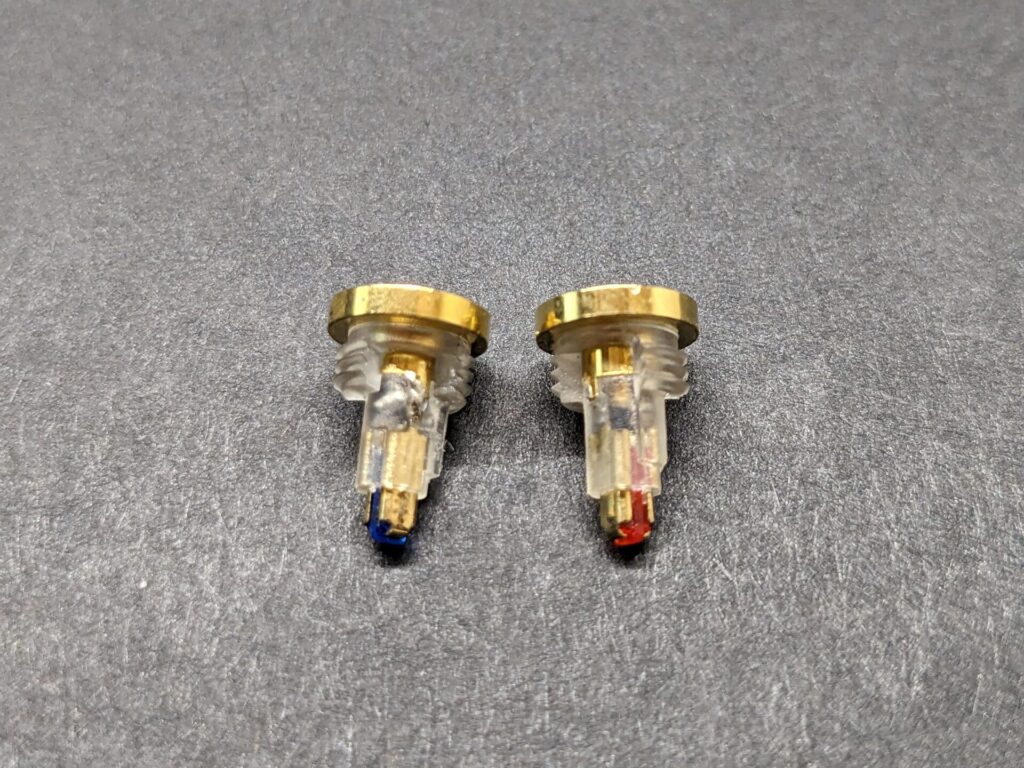


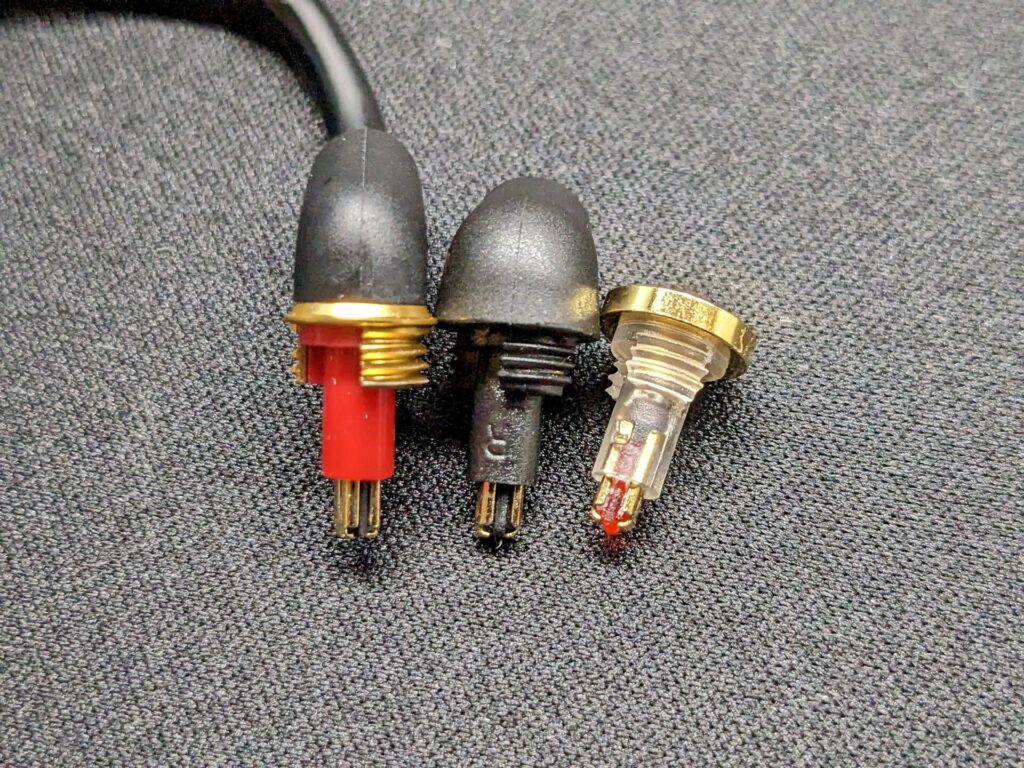


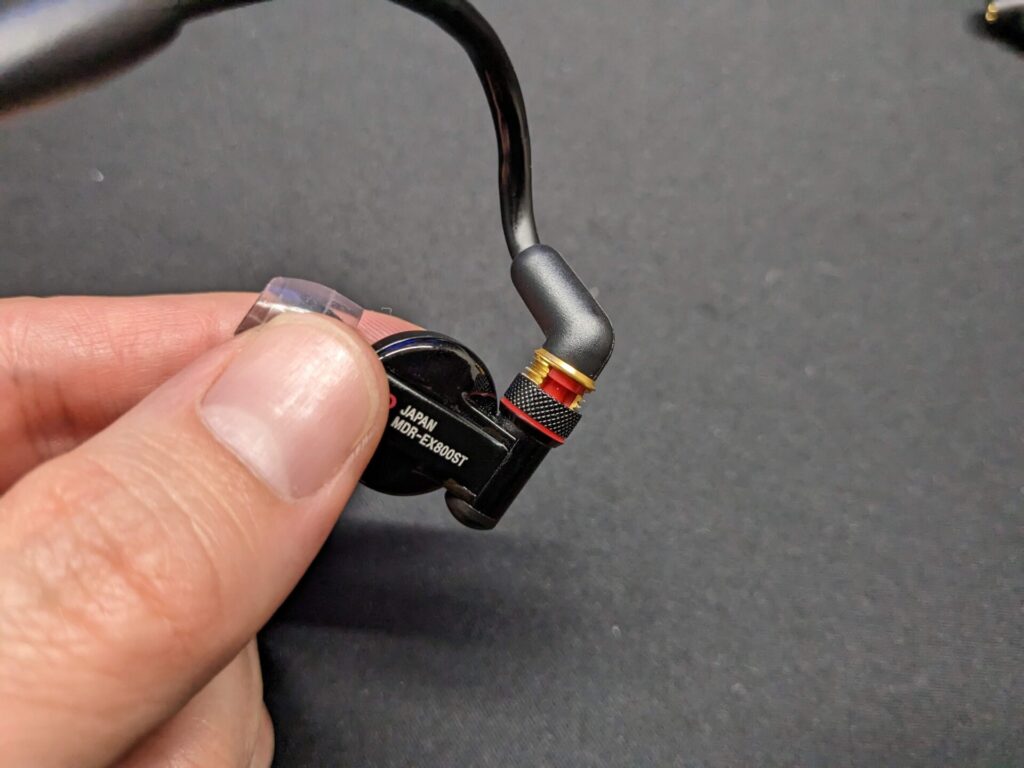
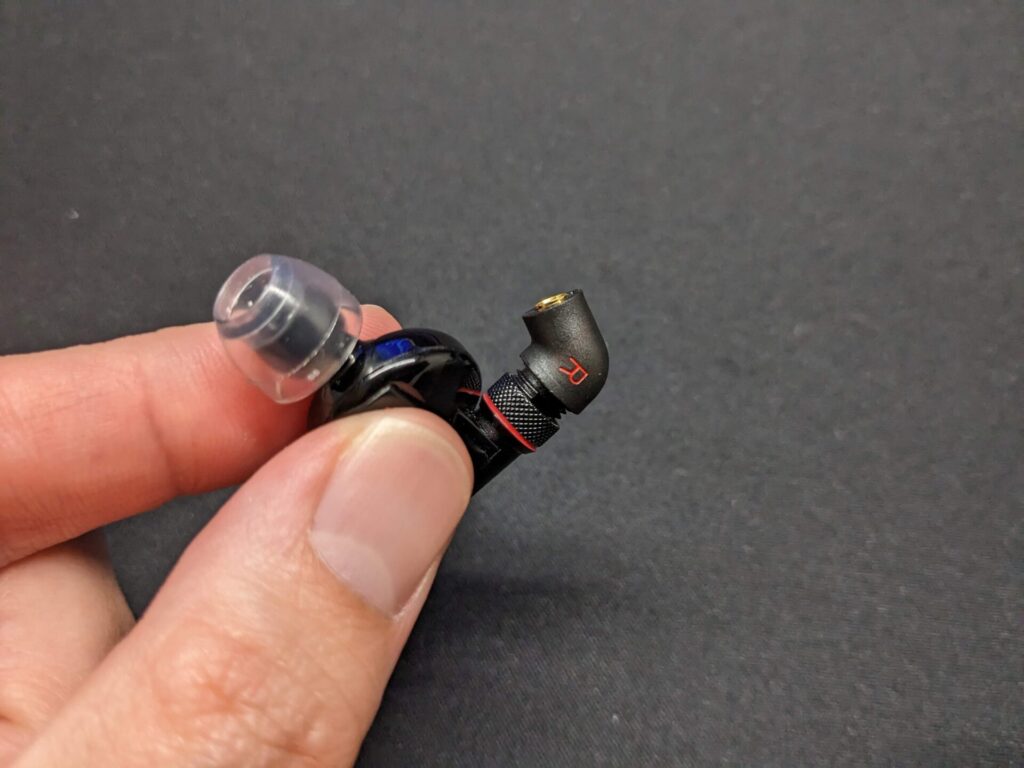
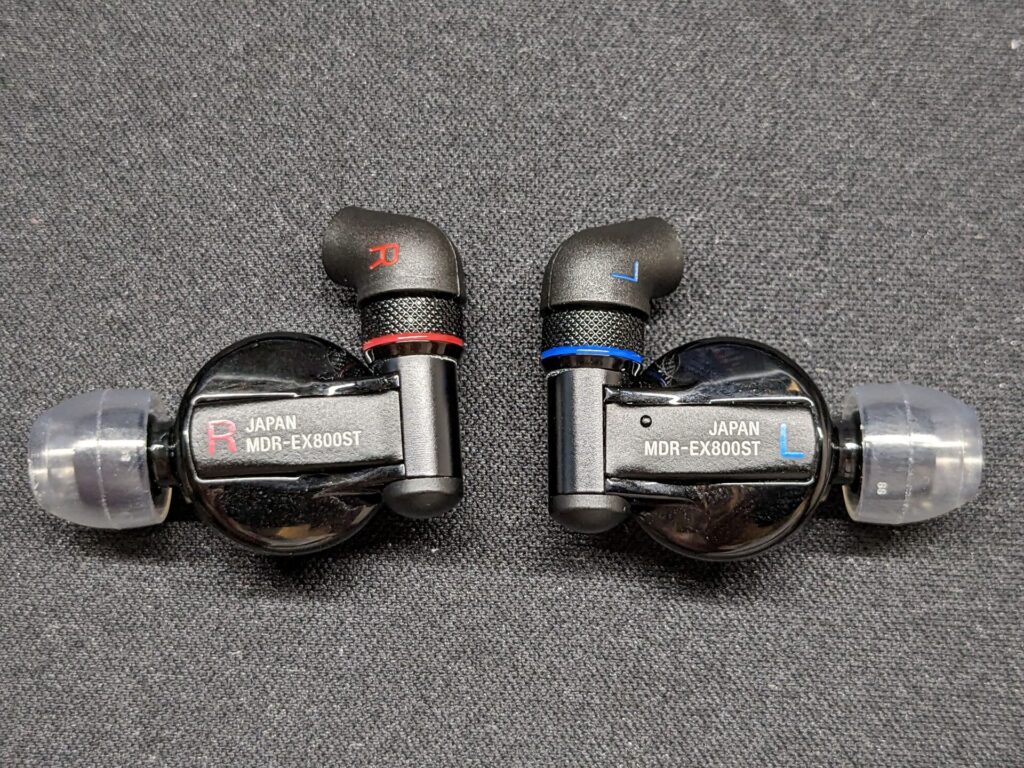
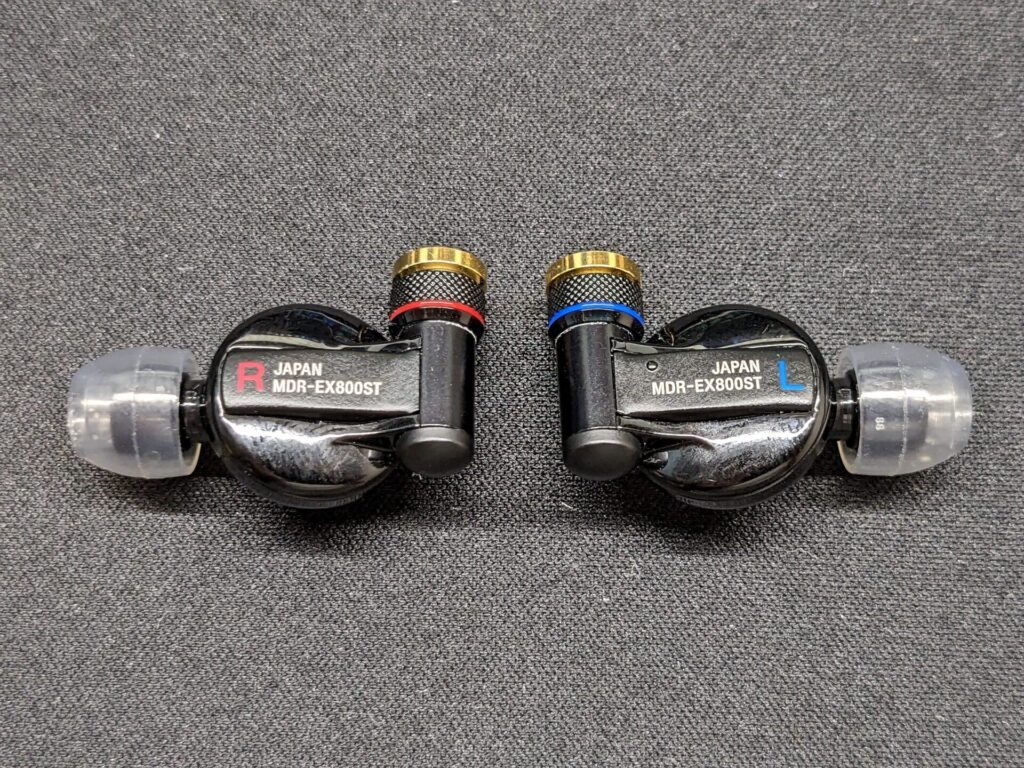


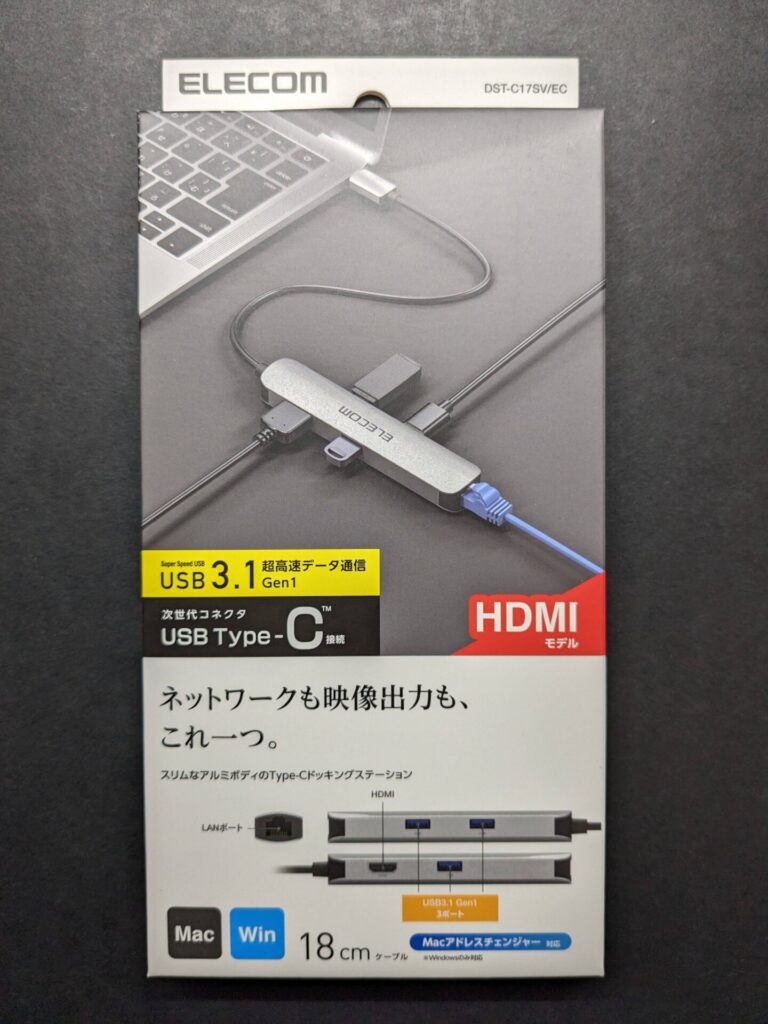
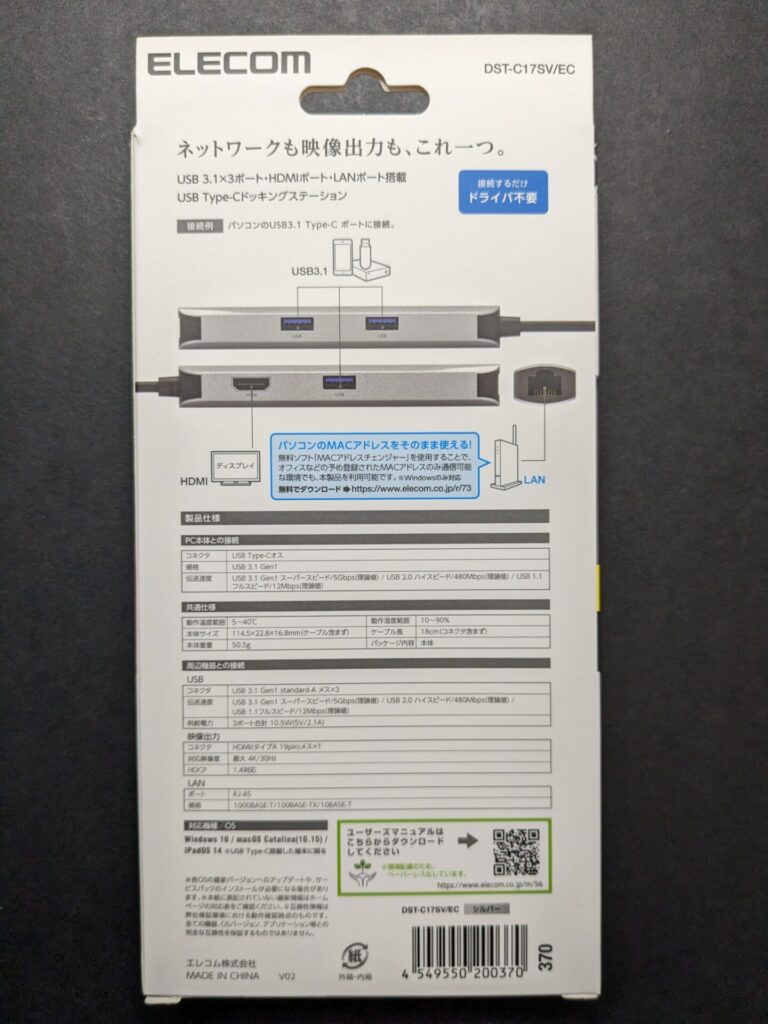


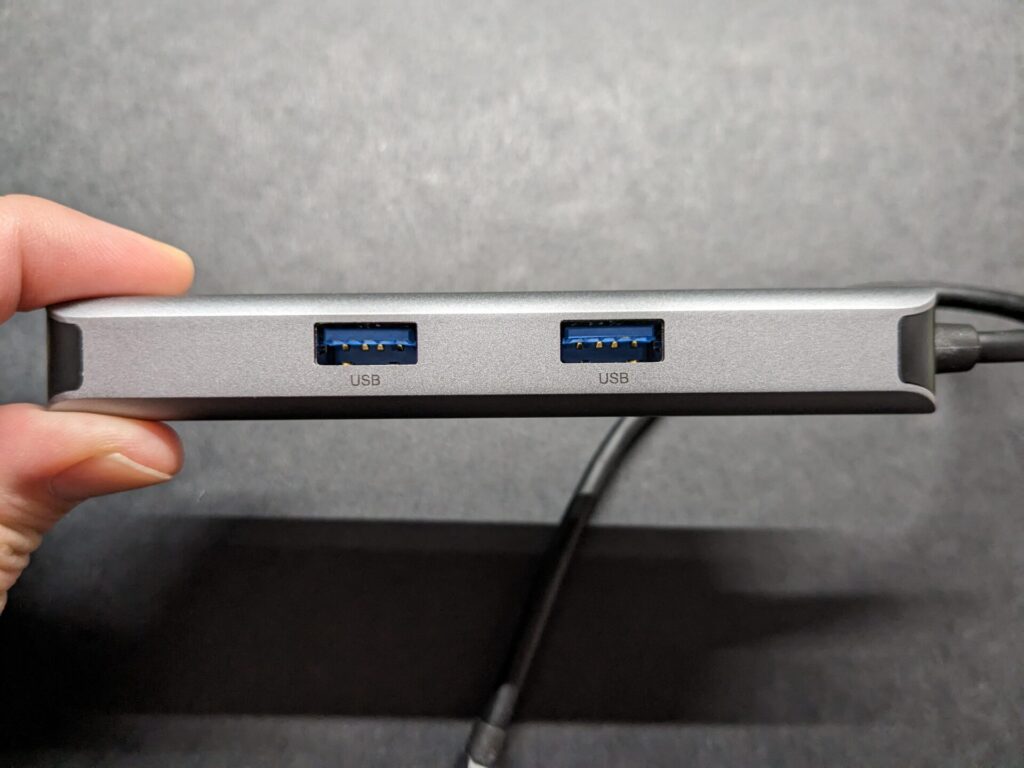
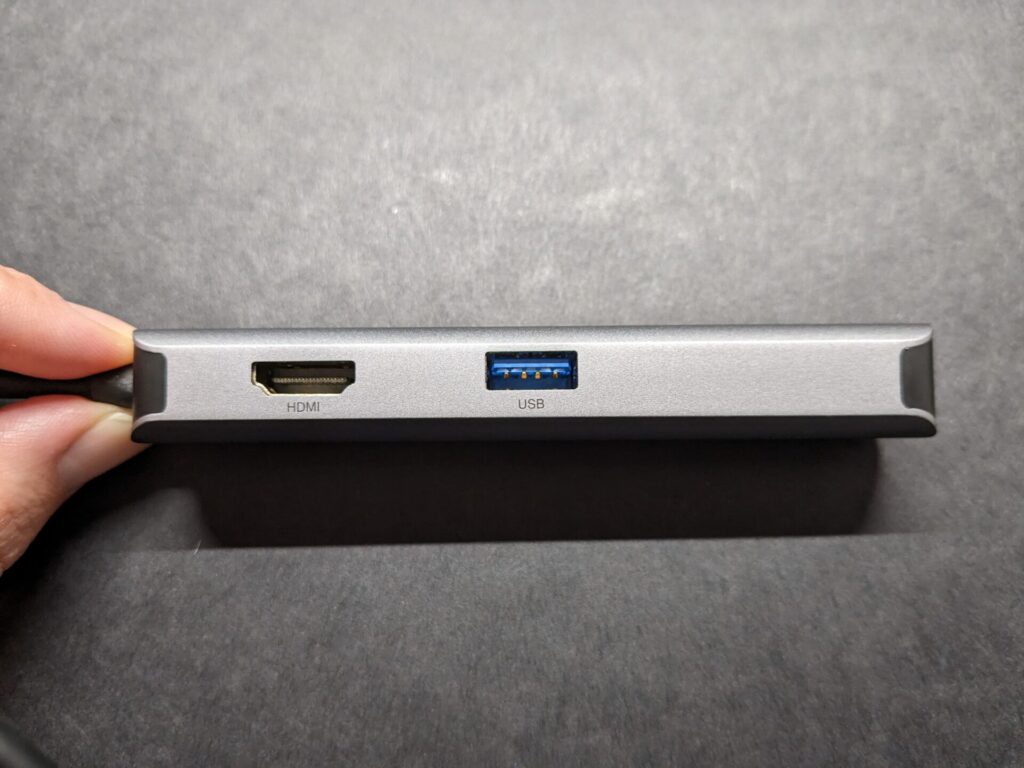


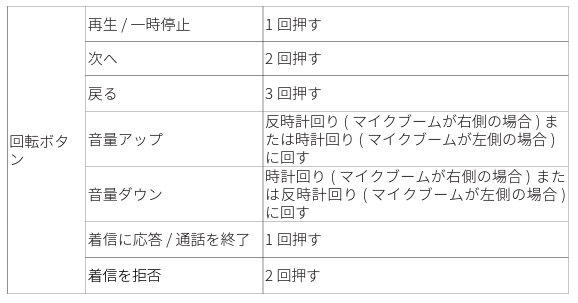

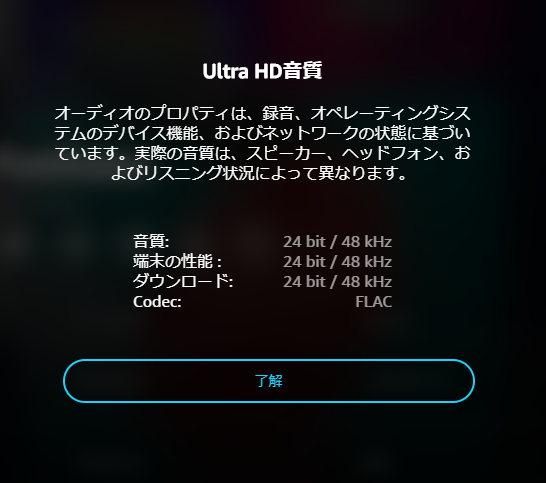
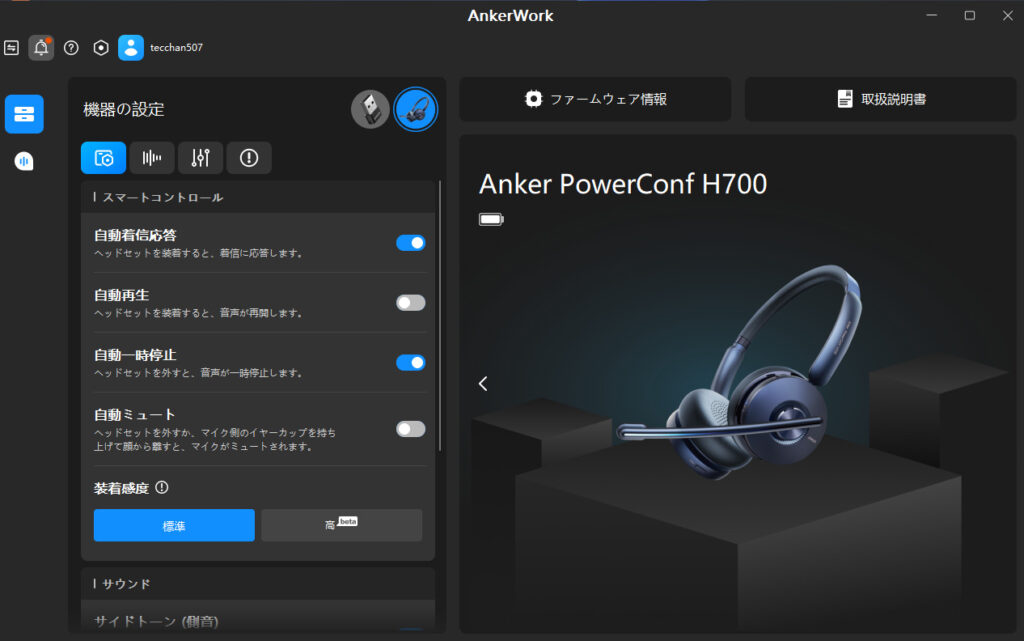
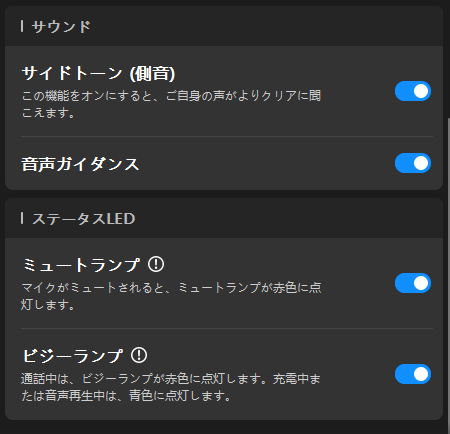


Commenta per primo